
Contents

Introduction
On the System Settings page, you can customize settings such as the display of your accounts and the PDF batch size.

Customize Account Benchmark Displays
When assign a market index to an account as a benchmark, you want the label on the report to tell you two things:
-
What is the name of the index?
-
Is this the primary index? Secondary index? etc.
By default, if an index was used as the benchmark for the entire reporting period, reports label the benchmark as a combination of the index name and the benchmark display name:
Index name + benchmark name
Example
An index is called S&P 500 Composite. It is set as Benchmark 1 for an account.
The benchmark display name for Benchmark 1 is Primary Benchmark.
On reports, the benchmark is labeled S&P 500 Composite (Primary Benchmark).
If the account benchmark index changed partway through the reporting period, reports display only the benchmark's default display name:
Benchmark name
Example
An index is called S&P 500 Composite. It is set as Benchmark 1 for part of the reporting period. Then Benchmark 1 is changed to the Wilshire 5000 Total Market index for the rest of the reporting period.
The benchmark display name for Benchmark 1 is Primary Benchmark.
On reports, the benchmark is labeled Primary Benchmark for the period when two different indexes were applied.
Notes
In some reports, you can indicate when a benchmark index changed. For more information, see Display Changes to Benchmark Assignments.
The Account Benchmark Display section allows you to:
-
Enable or disable the display of benchmarks within reports. For more information, see Benchmarks.
-
Set the default display name for benchmarks when it is used in reports.
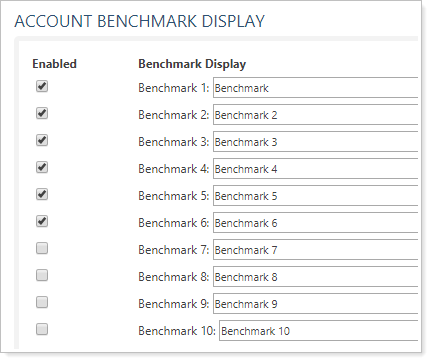
To rename a benchmark, type in the desired name for the benchmark and click Save.
Customize the Account Display Configuration
If you use account types or objectives in PortfolioCenter, you can now view the information in Advisor View. The account types and objectives make it easy to differentiate between accounts with similar names.
Once you've set up account types and objectives in PortfolioCenter, they'll be available in Advisor View the next time you synchronize data. To learn more about synchronizing data in Advisor View, visit Synchronize Data from PortfolioCenter.
In this section, you can customize how the account type and objective appear on your dynamic reports.
If you want to customize how the account type and objective appear on your dynamic reports:
-
On the Setup menu, click System Settings.
-
In the Account Display Configuration box, select the columns you want to appear.
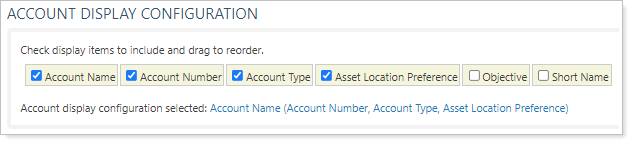
-
To change the order that the columns appear, click and hold down the left mouse button on the field you want to move and drag it to the desired location. Release the mouse button.
-
Click Save.
Customize the Client Display Configuration
This setting lets you set how a client's name is displayed on the client portal.
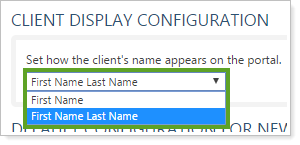
-
To display the client's full first and last name, choose First Name Last Name from the list.
-
To display only the client's first name, choose First Name from the list.

Note
The First Name and Last Name fields must be filled in on the Client Profile panel to use this customization.

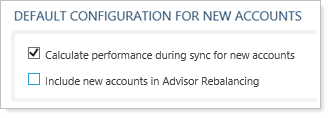
Default Configuration for New Accounts
You can select the following check boxes for your new accounts:
-
Calculate performance during sync for new accounts. You have complete control over whether or not you want Advisor View to calculate performance for new accounts during the sync. If you don't want Advisor View to calculate performance for new accounts during the sync, clear the Calculate performance during sync for new accounts check box and then click Save.
-
Include new accounts in Advisor Rebalancing. This check box determines whether new accounts are included in the export from Advisor View to Advisor Rebalancing.
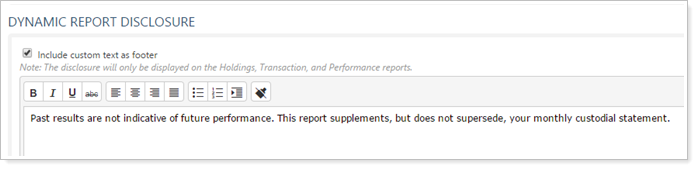
Dynamic Report Disclosure
To limit your liability, you can add compliance disclosures to dynamic report views. These disclosures appear on screen, on printed dynamic reports, and in CSV exports for all Holdings, Transaction, and Performance dynamic reports.
To add a disclosure to your dynamic reports:
-
Under the Setup menu, click System Settings.
-
In the Dynamic Report Disclosure section, add your desired disclosure. When you copy text in, all formatting, including HTML tags, will be removed. You can add formatting in using the available formatting buttons.
-
Click Save.
Enable/Disable Sign In Access Challenge Questions
Dual factor authentication protects against unauthorized logins or account break-ins. You can require advisors to answer challenge questions if they sign in from an unrecognized device. This is a firm-wide setting, so if you enable this feature, all advisors will be required to answer the challenge questions.
Important
If you have both Advisor View and Advisor Rebalancing, the authorization setting and the challenge questions will sync and apply to both products.
To require dual factor authentication:
-
On the Setup menu, click System Settings.
-
Under Dual Factor Authentication, select Require additional authentication when signing in.

-
If desired, configure the additional two settings:
-
Click Save.
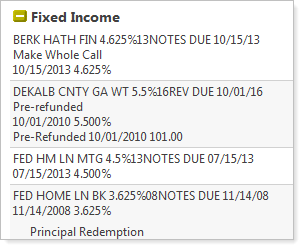
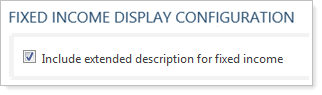
Fixed Income Display Configuration
You have the option to include the maturity date and annual income rate in the fixed income description for:
-
Fixed Income
-
CDs
-
Mortgage-Backed
-
Unit Trusts
-
Options (maturity date only)
-
T-Bills
-
Commercial Paper
| With Long Description... | Without Long Description... |
|---|---|
|
|
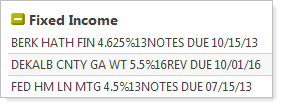
The information we include is based on the extended description you set up in PortfolioCenter.
To enable this option:
-
On the Setup menu, click System Settings.
-
Under Fixed Income Display Configuration, select the Include extended description for fixed income check box.
-
Click Save.
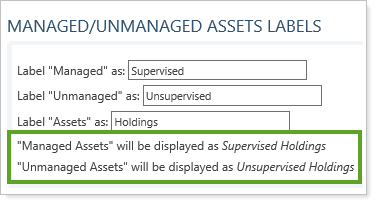
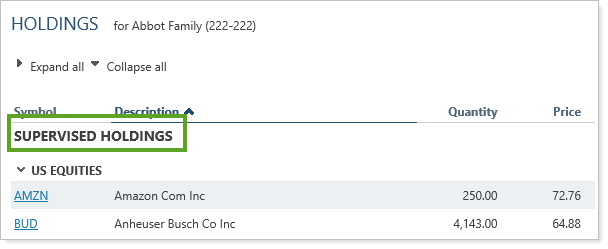
Customize Terminology for Managed/Unmanaged Assets
You can choose the terminology used for managed and unmanaged assets in your reports. For example, you may prefer to change the default terms "Managed Assets" and "Unmanaged Assets" to "Supervised Holdings" and "Unsupervised Holdings."
To do this, on the Setup menu, click System Settings. You can type your terms in the Managed/Unmanaged Asset Labels section. After you've entered your terms, you'll see a preview of the names as they'll appear on reports.
Your changes will be shown on the following reports (both PDF and dynamic, but not bulk reports):
Note
Use the Excluded Securities Panel to designate all or some securities as unmanaged assets at the account level.
PDF Batch Size
When you generate PDF reports for a large number of accounts, Advisor View combines the individual PDF files in a ZIP file. In some cases, Advisor View adds 50 PDF files to each ZIP file. If you printed PDF reports for 200 accounts, Advisor View would then create four ZIP files – with 50 PDF files in each ZIP file.
You can change the number of report files that Advisor View adds to each ZIP file. For example, you may want to increase the number of PDF files in each ZIP file to 200 or even 500.
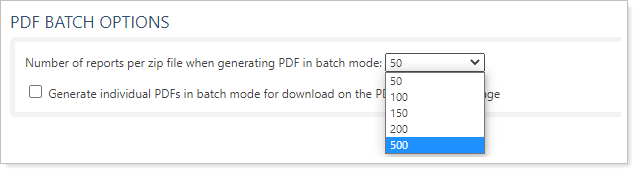
To set the number of PDF files in a ZIP file:
-
On the Setup menu, click System Settings.
-
Under PDF Batch Options, choose the number of report files that Advisor View should add to each ZIP file. On a slow Internet connection, it’s best to use a low number so you can download the files faster.
-
Optional: To create individual PDF files instead of using a ZIP file, select the Generate individual PDFs in batch mode for download on the PDF Report Status page check box. If you select this option you will need to individually click each PDF file on the PDF Report Status page to download the file. If you generate 500 PDF files, that will be time-consuming.
-
Click Save.