
Contents
|
|

Introduction
The upload feature in Advisor Rebalancing allows you to add or change a large amount of data at one time. You can upload new data, such as creating new models in bulk. You can also use the upload feature to change existing data in bulk, such as updating the custodian and associated fee schedule for many accounts at once.
You can upload data to Advisor Rebalancing using the available upload data sets. These data sets are a defined list of required, conditional, and optional fields you can use to add or change data in Advisor Rebalancing. Below, you can find a list of available upload data sets and the data you can add or change using that upload data set.
important
Uploads overwrite existing data instead of adding to existing data. For example, if the Smith Family rebalancing group has three accounts and you use upload to update the rebalancing group and only include two of those accounts, the third account is no longer considered part of the Smith Family rebalancing group.
For more information on the data specifications for individual fields of these upload data sets, see Data Specifications.

Uploading Data vs. Using the Interface
There are many actions and changes that can be completed two different ways: through the Advisor Rebalancing interface and through upload. In many cases, both methods achieve the same results. However, each has advantages and disadvantages.
Uploading data allows you to make large-scale changes or changes to many accounts all at once, saving you time. Making changes through the Advisor Rebalancing interface is quick, has little room for error, and is better for changes to one or a few account at a time. Consider this example:
Example
Your clients, Bob and Melissa, have multiple accounts with your firm. Yesterday, Melissa opened an additional brokerage account. While setting up the new account, you go to the Account Settings page and associate the new account with the correct Custodian.
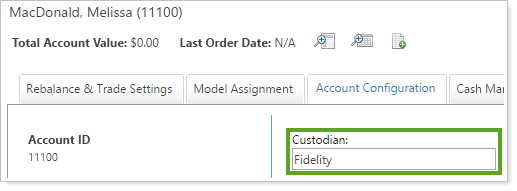
Later, your firm decides to change the custodian for hundreds of existing accounts. While you could use the same process to update the Custodian for each of those accounts, this would be a time-consuming process where someone would need to search for each of the accounts, and then update the Custodian field.
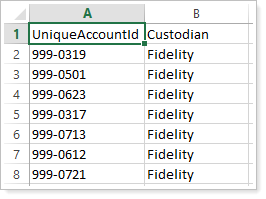
Instead, you can update the Custodian field for each of these accounts through upload. Using the Data Specifications for the Account Information upload data set, you create a spreadsheet with the corrected custodian.
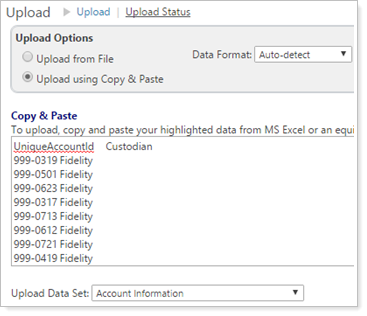
You then use the Upload page to update each of the accounts at once, rather than updating each account individually.
Available Upload Data Sets in Advisor Rebalancing
You can use the following data sets to upload data into Advisor Rebalancing:
| Data Set | More Information | Corresponding Action |
|---|---|---|
|
Multi-Data Set |
Upload data for more than one data set at once. For example, you could upload data from the Account Information and Account Keywords data sets at the same time. |
Multiple |
|
Account Alternate Security Sets |
Define alternate security sets in individual accounts; alternate security sets allow you to maintain fewer models by creating different Security Level models to assign to different account types. |
|
|
Account Holdings |
Create or update security holdings in an account by upload. This data usually comes from your portfolio accounting system (PAS), though you can make changes to holdings by upload. |
N/A |
|
Account Information |
Create or change specific account information by upload. You can also create new accounts using this upload NoteTo change a field for a large number of accounts at once, create the Account Information (upload format) bulk report, make the needed changes, and use this bulk report to upload the changed data. For more information, see Upload Data Sets and Bulk Reports. |
Create and Delete Accounts and Make Changes to Account Settings |
|
Account Keywords |
Add keywords to specific accounts. Keywords can be any word or words you want to use to label the account; you can use saved searches to find accounts with specific keywords. |
|
|
Account Security Restrictions |
Add security restrictions to the individual accounts you specify. |
|
|
Account Security Restrictions Range to Hold |
Add security restrictions to the individual accounts you specify. This upload works in conjunction with the Account Security Restrictions upload though, because the uploads won't always have a one-to-one relationship, this is a separate upload data set. |
|
|
Add submodels to an existing Allocation model and specify model details such as rank and min/max values. NotesWhen creating Allocation models by upload, use the following order:
The upload may fail in the following instances:
|
||
|
Alternate Security Set Settings |
Associate an already created alternate security set with an existing Security Level model; alternate security sets allow you to maintain fewer models by creating different Security Level models to assign to different account types. |
|
| Alternate Security Sets |
Create new alternate security sets and specify additional details such as rank and min/max values. Alternate security sets allow you to maintain fewer models by creating different Security Level models to assign to different account types. |
|
|
Cash Reserves |
Create cash reserves in the individual accounts you specify. You can also use this upload to update time-bound cash reserves. For example, you can identify RMD clients using a saved search, then use that saved search to generate the Cash Reserves (upload format) bulk report. You can then update the start date to the next year, then upload that data back into Advisor Rebalancing. For more information, see Upload Data Sets and Bulk Reports. |
|
|
Create an Allocation model name. NoteWhen creating Allocation models by upload, use the following order:
|
||
|
Create a Security Level model name. NoteWhen creating Security Level models by upload, use the following order:
|
||
| Custom Input Symbols |
Map securities to a custom symbol you specify; this allows you to take an unrecognized symbol that exists in your portfolio accounting system (PAS) and map that symbol to an alternate symbol in Advisor Rebalancing. NoteThe CustomInput field is the unknown security that you want to map the existing tickers to. The specific fields in this upload are available in Data Specifications. |
|
| Custom Security Settings |
Establish custom settings for individual securities, like custom trade price or custom round lot. |
|
| Dividend Reinvestments |
For Axys users, allows you to identify lots as reinvested dividends. |
N/A |
| Industry Group Restrictions |
Create industry group restrictions in individual accounts. |
|
| Model Priorities |
After establishing asset location preference labels, you can use this data set to create model priorities for those asset location preference labels. |
|
| Modify UniqueAccountId |
Update the UniqueAccountId field for an account. Though infrequently used, this upload data set can be used to resolve issues between your portfolio accounting system (PAS) and Advisor Rebalancing if accounts contain special characters like dashes or periods. NoteIf you also use Advisor View, do not use this upload data set. Advisor View will overwrite your changes the next day. Contact Tamarac service for assistance. |
N/A |
| Rebalancing Groups |
Create the names of rebalancing groups. NoteWhen creating rebalancing groups by upload, use the following order:
|
|
| Recent Trades |
Add recent trades made outside of Advisor Rebalancing to individual accounts for the purposes of avoiding wash sales. This upload will not update or change account holdings. |
|
| Securities in Security Level Model |
Add securities to an existing Security Level model and specify model details such as rank and min/max values. NotesWhen creating Security Level models by upload, use the following order:
The upload may fail in the following instances:
|
|
| Substitute Securities |
Create global substitute securities. |
|
| Trade Group Security Settings |
Configure trade file group settings for individual securities, allowing you to customize trade files by group. |
|
| Trades for Reconciliation |
Add trades that have been executed, according to your portfolio accounting system (PAS). This upload data set defines executed trades that normally flow from your PAS into Advisor Rebalancing and can be used for reconciliation purposes. |
|
| Underlying Accounts for Rebalancing Groups |
Add accounts to an existing rebalancing group name. NoteWhen creating rebalancing groups by upload, use the following order:
|
|
|
Uploaded Search |
Create a custom saved search using your own list of accounts. This kind of search is useful for creating a saved group of accounts that don't share obvious common criteria that could be created using as saved search. |
For more information on the data specifications for individual fields of these upload data sets, see Data Specifications.
Upload Data Sets and Bulk Reports
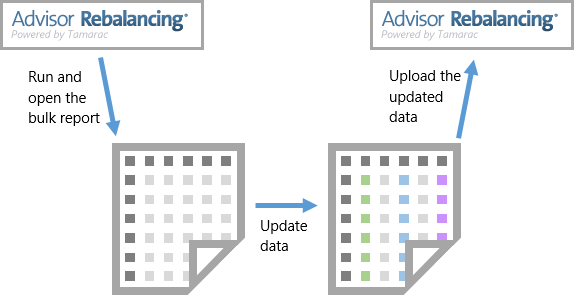
Many bulk reports are available in upload format. This means that the columns have been formatted to be re-uploaded back into Advisor Rebalancing. This is ideal for situations where you want to change the data for existing accounts or models, using this workflow:
-
Bulk report. Generate and run a bulk report using the columns you choose in the upload format. Download the report and open it in your spreadsheet program. For a list of available bulk reports in upload format, see Bulk Report Descriptions.
-
Update data. In your spreadsheet program, update the fields that require update.
-
Upload. Upload the updated data from your spreadsheet back into Advisor Rebalancing on the Upload page. For more information on uploading data, see Uploading Data.
important
-
After every upload, check the Upload Status page to ensure no errors or warnings appeared. These errors or warnings could prevent your data from appearing in Advisor Rebalancing and should be addressed as soon as possible.
-
Verify all column header data using Data Specifications to ensure you're uploading the correct fields and field types.
For more information on creating and using bulk reports, see Create, Edit, and Delete Bulk Reports.