
Contents
|
|

Introduction
The upload feature in Advisor Rebalancing allows you to add or change a large amount of data at one time. You can use upload to add new data, such as creating new models in bulk. You can also use the upload feature to change existing data in bulk, such as updating the custodian for many accounts at once.
When uploading data, you have two options: upload the file containing the data you want to update or copy and paste the data directly into Advisor Rebalancing. Before you upload data, you'll need to format the data to meet Advisor Rebalancing specifications.
For more information on specifications for individual fields, see Data Specifications. For more information on available upload data sets, see Available Upload Data Sets.
Best Practices
-
Verify all data before uploading it. Some uploads overwrite existing data rather than adding to existing data. For example, if the Smith Family rebalancing group has three accounts and you use upload to update the rebalancing group and only include two of those accounts, the third account is no longer considered part of the Smith Family rebalancing group.
-
If making changes to a single account or only a few accounts, use the interface, which has little room for error. If updating a large number of accounts, save time by using upload.
-
After every upload, check the Upload Status page to ensure no errors or warnings appeared. These errors or warnings could prevent your data from appearing in Advisor Rebalancing and should be addressed as soon as possible.

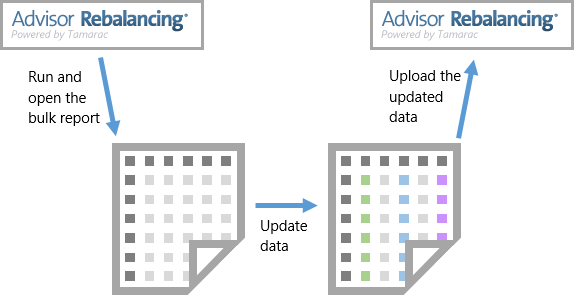
Uploads Data Sets and Bulk Reports
Many bulk reports are available in upload format. This means that the columns have been formatted to be re-uploaded back into Advisor Rebalancing. This is ideal for situations where you want to change the data for existing accounts or models, using this workflow:
-
Bulk report. Generate and run a bulk report using the columns you choose in the upload format. Download the report and open it in your spreadsheet program. For a list of available bulk reports in upload format, see Bulk Report Descriptions.
-
Update data. In your spreadsheet program, update the fields that require update.
-
Upload. Upload the updated data from your spreadsheet back into Advisor Rebalancing on the Upload page.
important
-
After every upload, check the Upload Status page to ensure no errors or warnings appeared. These errors or warnings could prevent your data from appearing in Advisor Rebalancing and should be addressed as soon as possible.
-
Verify all column header data using Data Specifications to ensure you're uploading the correct fields and field types.
For more information on creating and using bulk reports, see Create, Edit, and Delete Bulk Reports.
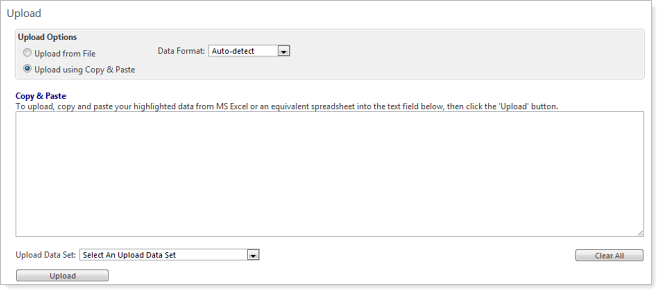
Upload Data Using Copy & Paste
If you've prepared data to upload into Advisor Rebalancing, you can quickly and easily upload that data by copying it from a spreadsheet or file and pasting it directly into Advisor Rebalancing. This is the easiest way to upload data to Advisor Rebalancing.
To upload data by copying and pasting it, follow these steps:
-
Open the file that contains the formatted data you want to upload. Often, this is done in a spreadsheet program like Excel.
-
Select and copy the data. You can use Ctrl+A to select all data and Ctrl+C to copy the data.
-
Click Upload on the Upload menu in Advisor Rebalancing.
-
Select the Upload using Copy & Paste option.
-
Choose an option in the Data Format list.
Option More Information Auto-detect Advisor Rebalancing will automatically detect the type of file you upload. In most cases, this is the best option to choose.
Custom Delimited If the file is custom delimited—that is, it uses a specific character to separate data points—choose this option and then specify what the delimiter is (for example, a semi-colon or comma).

-
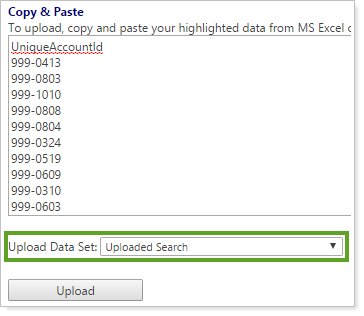
Paste the data into the Copy & Paste box. You can do this by using Ctrl+V.
-
In the Upload Data Set list, you can choose the applicable data set for your upload. For more information on available upload data sets, see Available Upload Data Sets.
-
Click Upload.
-
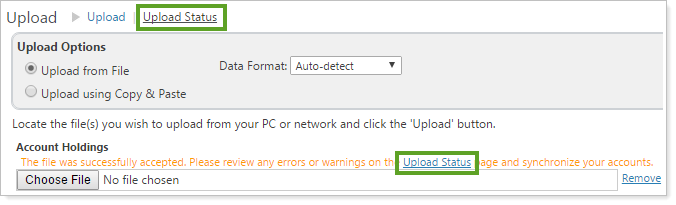
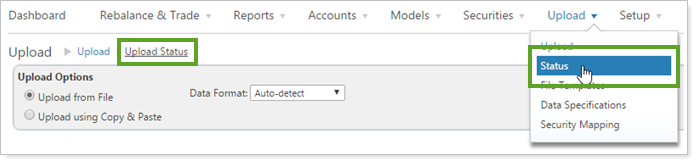
Click the Upload Status link to go to the Upload Status page. This page allows you to verify if upload was completed successfully and to check for possible errors or warnings.
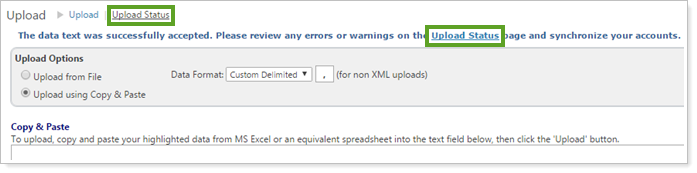
You may need to synchronize this data after it's been uploaded. For more information, see Synchronize Data After Upload.
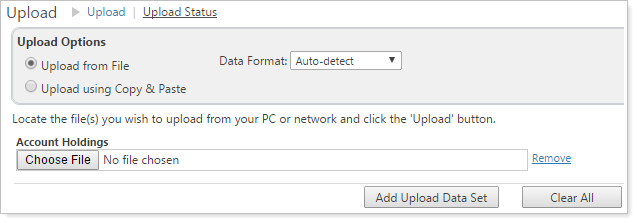
Upload Data From a File
If you have an existing data file you want to upload to Advisor Rebalancing, you can upload the file rather than copying and pasting all the data using the Copy & Paste feature.
To upload data from a file, follow these steps:
-
Click Upload on the Upload menu.
-
Select the Upload from File option.
-
Choose an option in the Data Format list.
Option More Information Auto-detect Advisor Rebalancing will automatically detect the type of file you upload. In most cases, this is the best option to choose.
Custom Delimited If the file is custom delimited—that is, it uses a specific character to separate data—choose this option and then specify what the delimiter is (for example, a semi-colon or comma).
-
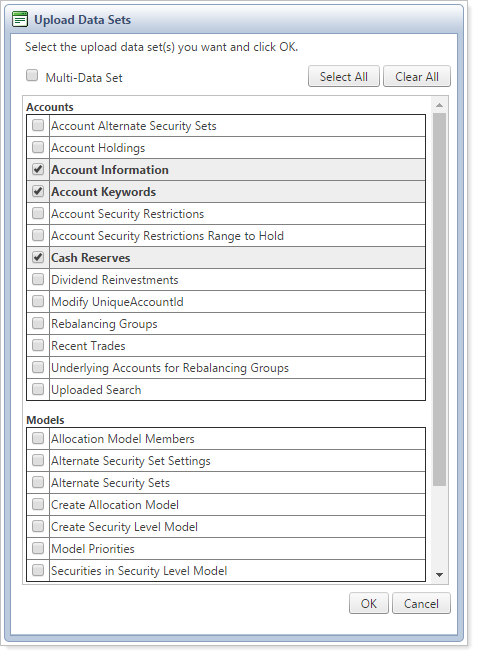
Click Add Upload Data Set. In the Upload Data Sets dialog box, choose the corresponding data set for the file you want to upload, and then click OK. You may upload multiple data sets at once.
For more information on available upload data sets, see Available Upload Data Sets.
-
Click Choose File for each data set you chose.
-
Locate the data file you want to upload and click Open. Repeat this step for each data set you want to upload.
-
Click Upload.
-
Click the Upload Status link to go to the Upload Status page. This page allows you to verify if upload was completed successfully and to check for possible errors or warnings.
You may need to synchronize this data after it's been uploaded. For more information, see Synchronize Data After Upload.
After the Upload
After you upload data, he following are important workflow steps to take.
The Upload Status Page
The Upload Status page allows you to view details about the uploads you've made to Advisor Rebalancing. It also allows you to see if your previous uploads were successful and read any warnings or errors generated due to the uploaded data.
important
After every upload, check the Upload Status page to ensure no errors or warnings appeared. These errors or warnings could prevent your data from appearing in Advisor Rebalancing and should be addressed as soon as possible.
For more information on viewing and troubleshooting the status of your uploads as well as any errors or warnings, see Upload Status and Troubleshooting.
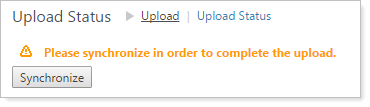
Synchronize Data After Upload
After uploading new data to Advisor Rebalancing, that data needs to synchronized with existing data within Advisor Rebalancing. This is a similar process to saving accounts. You can make changes to an account, but these changes aren't reflected until you click Save.
If you enable the Automatically synchronize accounts after uploading from the Upload page option on the System Settings page, this process will occur automatically after you upload data. You won't need to take further action. This option is not enabled by default.
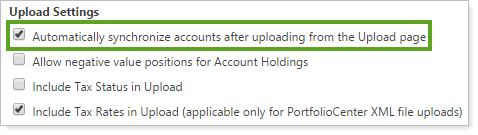
If this option is disabled, you will need to synchronize data after an upload by clicking the Synchronize button on the Upload Status page.
Best Practice
Enable the Automatically synchronize accounts after uploading from the Upload page option to ensure accounts are always properly synced after upload.
Add Upload Errors and Warnings to Your Workflow
The Upload Errors and Warnings widget shows the number of upload error and warnings for each of the data sets you add to the widget. Errors and warnings are added together to give you the number that appears in the widget. Each data set name is also a link which takes you directly to the Upload Status page, allowing you to view the errors and warnings.
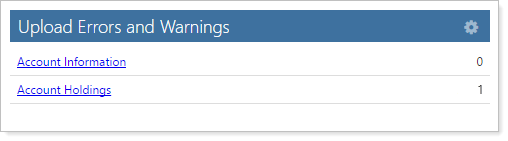
You can customize this dashboard widget to add and remove data sets. For more information, see Upload Errors and Warnings Dashboard Widget.
Associated System Settings
The Upload Settings section of the System Settings page allows you to set certain data upload settings. These settings can affect how Advisor Rebalancing treats your uploaded data.
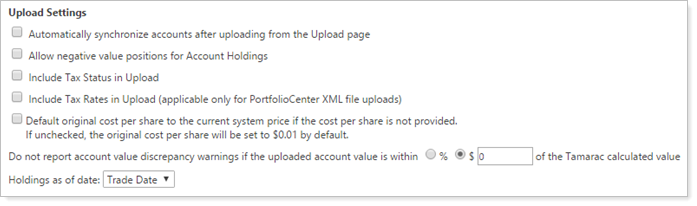
The following settings are available:
-
Automatically Synchronize Accounts After Uploading from Uploads Page: Choose if you'd like Advisor Rebalancing to automatically sync accounts after uploading any data set. For more information, see Synchronize Data After Upload.
-
Allow Negative Value Positions for Account Holdings: Choose if you'd like Advisor Rebalancing to recognize negative value positions. If you also use Advisor View, select this option to ensure data in Advisor View matches data in Advisor Rebalancing.
-
Include Tax Status in Upload: Choose whether or not you want to include tax status information when you upload account data. This setting is applicable only to PortfolioCenter XML file uploads.
-
Include Tax Rates in Upload: Choose whether you'd like Advisor Rebalancing to include tax rates when you upload account data.
-
Default Original Cost Per Share to the Current System Price if the Cost Per Share is Not Provided: Choose how you'd like to treat the original cost per share of securities that have no original cost per share provided. The option you choose will affect any gain/loss reporting on that security.
-
Do not Report Account Value Discrepancy Warnings if the Uploaded Account Value is Within...: Choose a threshold type—either % or $—and amount for account discrepancy. If you upload data for an account outside of that range, Advisor Rebalancing will warn you.
-
Holdings As of Date: Choose whether you'd like uploaded holdings updates to set the pricing date to the close date or trade date of the security.
For more information on these Upload Settings, see System Settings: Upload Settings.