Contents
|
|
How Available/Selected Columns Works
| Applies to: | ||
|---|---|---|
| ✔ Dynamic |
✔ Client Portal |
|
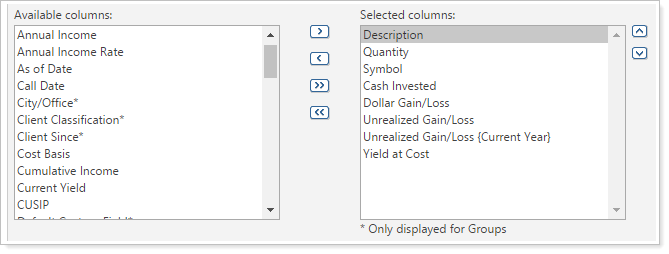
This setting allows you to choose the columns you want to appear on the report.
-
To add a column, in the Available columns box, click the column you want to add and then click
 .
. -
To remove a column, in the Selected columns box, click the column you want to remove and then click
 .
. -
To add all columns, click
 .
. -
To remove all columns, click
 .
. -
Use the
 and
and  buttons to arrange the columns on the report.
Columns Available
The exact columns available will vary by report. Some reports may allow you to use this same feature to add or remove rows.
Note
The available columns include custom fields for accounts, groups, Households, and securities. For more information about custom fields, see Custom Fields for Accounts, Reporting Groups, Households, and Securities.
In Dynamic Reports
On dynamic reports, you can edit the name of each column to adhere to your firm's naming conventions.

To edit a column name in a dynamic report:
-
Add the desired column to the Selected columns list.
-
Click the column name.
-
Under Formatted name, clear the Use default check box.
-
Type in the custom name for the column.
-
Click Save to save all edits to the report settings.
Notes
-
When creating your own names for columns, there is a risk of creating duplicate field names. This will result in columns named the same thing on a report.
-
Select the Use default check box to return the formatted name to the original default.
-
Follow firm naming conventions for consistency.
In PDF Reports
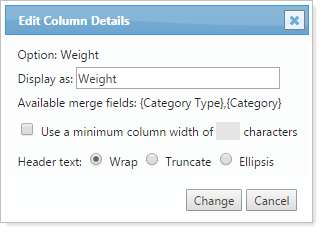
On PDF reports, when you add columns, the following settings are available:
Edit Column Name
To edit a column name in a PDF report:
-
Add the desired column to the Selected columns list.
-
Double-click the column name.
-
In Edit Column Details, type the desired name in the Display as field.
-
Click Change.
For more information about customizing column names, see Customize the Name of Column Headings for PDF Reports.
Set Minimum Column Width
To ensure that your column names fit, you can set a minimum column width:
-
Add the desired column to the Selected columns list.
-
Double-click the column name.
-
In Edit Column Details, select the Use a minimum column width of ___ characters check box.
-
Enter the number of characters you want the column to fit.
-
Click Change.
Determine Column Header Behavior
If a column name is too long to fit in the width available, you can set what happens to the header. You have the following options:
| Setting | Report Output |
|---|---|
| Wrap |
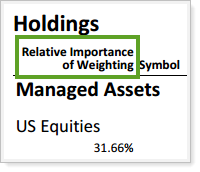
The row height will be increased so that you can see all the text. Typically the wrapping will occur where there is a space. |
| Truncate |
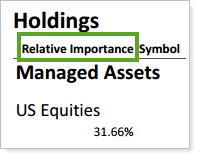
The text will be cut off at the minimum width you set. |
| Ellipsis |
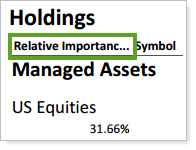
You'll see an ellipsis after your truncated text to indicate there's more text than what is shown. |
To set header text behavior:
-
Add the desired column to the Selected columns list.
-
Double-click the column name.
-
In Edit Column Details, under Header text, choose the desired behavior.
-
Click Change.
Note
In the Selected columns list, columns with customized widths are green. Columns with default widths are black.

For more information about custom column widths, see Set Column Widths for PDF Reports.
Reports With This Setting
Performance Reports
|
Holdings Reports
Transaction Reports
Related Settings
For more information about column widths in PDF reports, see Set Column Widths for PDF Reports.
For more information about customizing column names, see Customize the Name of Column Headings for PDF Reports.


