 Back
Back Home > Advisor View > Reports > Dynamic and PDF Reports > PDF Template Customization > Customize How PDF Templates Look > Set Column Widths for PDF Reports
|
Back |
Home > Advisor View > Reports > Dynamic and PDF Reports > PDF Template Customization > Customize How PDF Templates Look > Set Column Widths for PDF Reports
|
Set Column Widths for PDF Reports
You can use the space on your PDF reports most efficiently by adjusting your column widths. A preview allows you to see exactly how the columns will look and which columns need to be adjusted. You'll also see the theme you've selected, since font choices will affect how the columns fit in the available space.

By ensuring that all of your selected columns fit on the page, you can reduce the chances of rendering errors.
The PDF reports that allow you to adjust custom column widths are:
|
|
You can also adjust column widths for the following content types on the PDF Dashboard reports:
Account Ledger
Asset Allocation
Bond Analysis
Comparative Review
Holdings
Realized Gains/Losses
Unrealized Gains/Losses
To set the column widths for a PDF report:
On the Client Reporting menu, click Templates.
In the Select Template list, choose the PDF template you want to modify (you can also set column widths when you create a PDF template).
Click on a section that allows you to set custom column widths.
Click the Preview check box to see a preview of your table. The preview is updated automatically as you select columns and set their order and minimum widths. It also updates to show any theme changes. For more information on this setting, see Preview.

Identify on the preview which columns have widths that could be improved by changing the width.

Double-click any selected column to set a minimum column width and indicate how the text will display if it exceeds the available column width.

The column width will not be less than the approximate character width you set, but it will not be limited to that width—it may expand to take advantage of any available space.
If a column name is too long to fit in the width available, you can set what happens to the header. You have the following options:
| Setting | Report Output |
|---|---|
| Wrap |
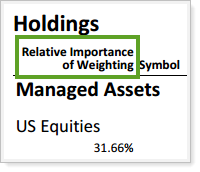
The row height will be increased so that you can see all the text. Typically the wrapping will occur where there is a space. |
| Truncate |
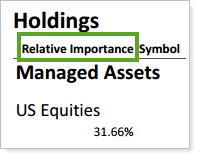
The text will be cut off at the minimum width you set. |
| Ellipsis |
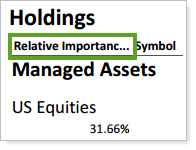
You'll see an ellipsis after your truncated text to indicate there's more text than what is shown. |
Click Change.
Add or remove columns as needed, to fit the space available. For more information, see Available/Selected Columns.
When finished customizing the report, click Save.
To set the column widths for sections of a PDF Dashboard report:
On the Client Reporting menu, click Templates.
In the Select Template list, choose the PDF template you want to modify. For more details on using the PDF Dashboard section, see PDF Dashboard Report and Manage Panels on the PDF Dashboard.
On the panel where you want to edit the column widths, click the Settings button  . This opens a window to edit the selected panel.
Double-click any selected column to set a minimum column width and indicate how the text will display if it exceeds the available column width.
The column width will not be less than the approximate character width you set, but it will not be limited to that width—it may expand to take advantage of any available space.
If a column name is too long to fit in the width available, you can set what happens to the header. You have the following options:
| Setting | Report Output |
|---|---|
| Wrap |
The row height will be increased so that you can see all the text. Typically the wrapping will occur where there is a space. |
| Truncate |
The text will be cut off at the minimum width you set. |
| Ellipsis |
You'll see an ellipsis after your truncated text to indicate there's more text than what is shown. |
Click Change.
Add or remove columns as needed, to fit the space available. For more information, see Available/Selected Columns.

