
Contents
|
|

Introduction
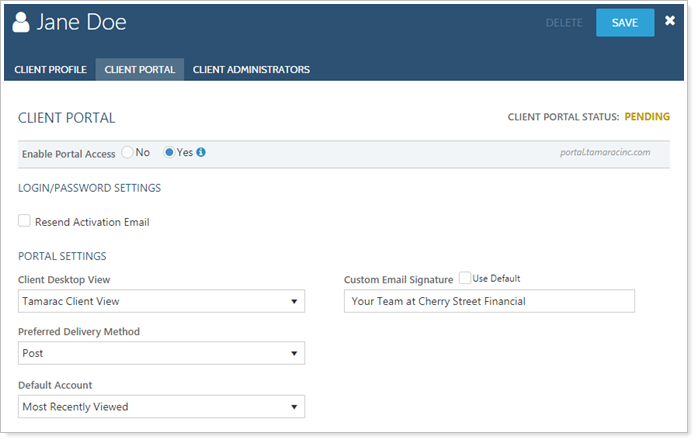
The Client Portal panel allows you to determine the look of the client portal and enable portal and mobile app access for the client.
See below for descriptions of each of the settings on the page.

Enable Portal Access
This option allows the client to sign in to a client desktop portal or the mobile app.
Some firms prefer to do this right away when setting up the portal, while others prefer to set up the client portal and leave it deactivated until they meet with the client in person and discuss the settings.
For detailed information about enabling portal access and resetting client passwords, as well as client portal security, see Client Portal Security.
To activate a client portal:
-
On the Accounts menu, click Clients/Client Portals.
-
Click the name of the client you want to enable client portal access for.
-
Click the Client Portal tab, and for Enable Portal Access choose Yes.

When you choose Yes to enable portal access, Send Activation Email is automatically selected.
Notes
-
Clear Send Activation Email to not immediately send the client an email notification with the activation link.
-
To send the activation email later, select Send Activation Email in the client record, or click Reset Password/Send Activation on the Clients/Client Portals page Actions menu.
-
Leave Send Activation Email selected to immediately send an activation email with an activation link to the client.
-
-
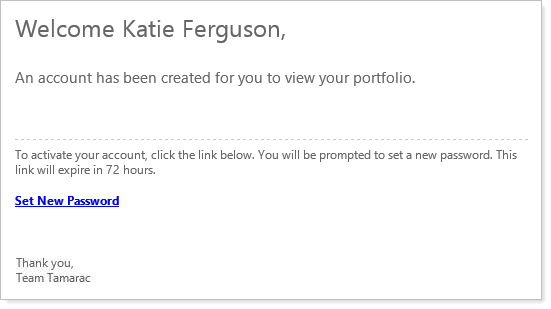
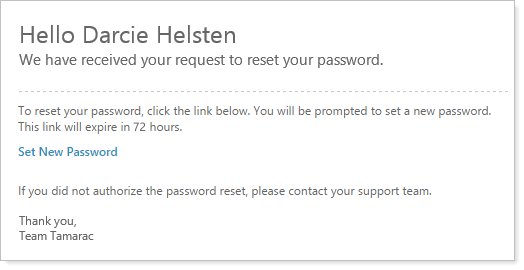
Click Save. When this change is saved, Advisor View sends the client an email with a link to the Set Password page. This link remains active for 72 hours.
Notes
If your client doesn't click the link within 72 hours, you can resend the password:
-
On the Client record, select Send Activation Email.
-
On the Clients/Client Portals page, select the client record(s) you want to resend. On the Actions menu, click Reset Password/Send Activation.
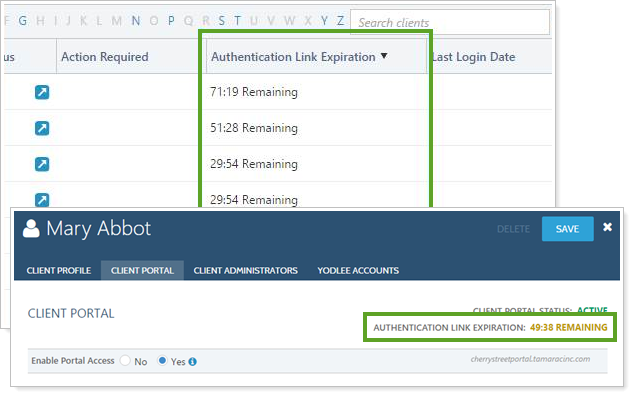
On the Clients/Client Portals page, the Authentication Link Expiration countdown timer tracks how much longer the link remains active.
-
-
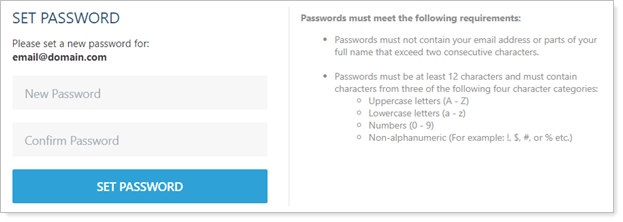
When your client clicks the Set New Password link, the Set Password page opens, where your client creates a new password.
Note
There is no disclaimer for clients to activate the portal. However, you can enable dual factor authentication for further portal security.
For details on how to use multi-edit activate client portals, see Client Portal Security.
The Mobile App Portal Code
When clients have an active portal, they can also access the portal using the mobile app. Clients log in to the mobile app using the portal code and their username and password.
The portal code is a Tamarac client portal prefix assigned to a client through the Household. The portal code is linked to whatever logo is assigned to the Household. For this reason, it's possible for different clients within your firm to have different portal codes.
You can find a client's specific portal code on the Client Portal panel under Enable Portal Access. The portal code appears before .portal.tamaracinc.com:

Example
Tamarac URL: https://cherrystreetfinancial.portal.tamaracinc.com
The portal code is cherrystreetfinancial.
When logging in to the standard app for the first time, clients enter the portal code to identify their correct portal. After the first login, the app remembers the portal code entered and auto-fills that field for future logins.
To learn more about the mobile app, see Introduction to Tamarac Mobile App and Learn More About the Tamarac Mobile App.
Reset Password
Select this check box to reset the client portal password for the client. You may wish to do this if a client calls you and has forgotten his or her password to the client portal. When you select this check box and click Save, Advisor View will send the temporary password to the client.
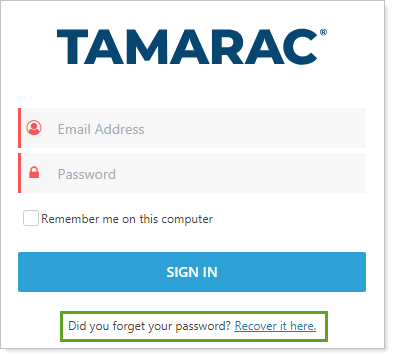
TIP
Clients can reset their passwords without calling you. On the Sign In page, they can simply click the Recover it here link and follow the on-screen instructions.
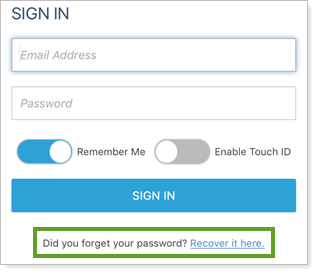
Clients can reset their passwords without calling you. On the Sign In page on the desktop or mobile app, they can simply click the Recover it here link and follow the on-screen instructions.
If your client is on vacation and doesn't get to the portal activation email before the link expires, or if he or she forgets the portal password, you can resend the activation email or send a password reset email.
To resend a password activation email or reset a password for an individual client:
-
Click Clients/Client Portals on the Accounts menu.
-
Click the name of the client you want to enable client portal access for.
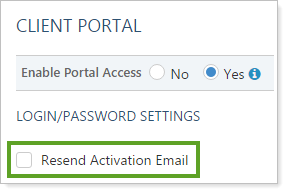
-
Click the Client Portal tab, then select Resend Activation Email. The name of the check box varies depending on the client's portal status, as does the email sent.
Note
This smart system sends a different automated email depending on the portal status.
Status Message Sent Inactive No email sent. To set up multiple clients with a portal initially, see Activate Multiple New Client Portals with Multi-Edit in Client Portal Security. Pending Advisor View sends the client email address on record a new activation email. Active Advisor View sends the client email address on record a password reset email. For more information about automated emails and email templates, see Customize the Automated E-mail Messages that Advisor View Sends.
-
Click Save. When this change is saved, Advisor View sends the client an email with a link to the Set Password page. This link remains active for 72 hours.
If your client doesn't click the link within 72 hours, you can resend the password multiple times. You can track how much longer the link remains active using the Authentication Link Expiration countdown timer.
Note
If your client can't find the automated email generated, you can suggest that the client:
-
Add the automated email address to their safe senders list.
-
Check their email spam folder.
-
-
Clicking the Set New Password link opens the Set Password page, where your client creates a new password.
For details on how to use multi-edit to reset or resend password emails, see Client Portal Security.
Enable Pershing Documents
This client setting allows you to enable the Pershing document vault integration for your clients.
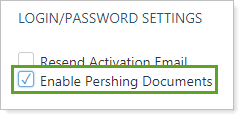
When enabled, your clients' document vault displays the same three Pershing folders available to you, making it much easier for clients to access custodial files.

Note
Pershing files are displayed for Households. Clients see the files for their Household in the document vault.
Check Authentication Link Expiration Countdown Timer
When you enable a client portal or reset a client's password, the client has 72 hours to click the link in the automatic email before the link expires. You can keep track of how much time remains for each link using the Authentication Link Expiration countdown timer.
Each time you send a client a new password email, the Authentication Link Expiration countdown timer resets.
You will find the Authentication Link Expiration countdown timer on the Client Portal panel and on the Clients page as a column.
You can sort the Authentication Link Expiration column on the Clients/Client Portals page to find all clients with outstanding links and see which ones may need a reminder or a new link sent.
Note
The Authentication Link Expiration countdown timer only appears on the Client Portal panel for clients with pending or active portal status.
Client Desktop View
Choose the client view for the client. For more information on client views, visit Create a Client View.
Preferred Delivery Method
You can set a default PDF report delivery method for your clients. When you generate your PDF reports, Advisor View can print the reports or post them to a client portal according to your client's preferences. You have the following options:
-
Post. This option allows you to post reports to the client portal by default for the client.
-
Download. This option saves the reports to your computer by default so you can print them and mail them to your clients.
-
Download and Post. This option posts the reports to the client portal by default for the client and also saves the reports to your computer so you can print them and mail them to the clients.
Default Account
You can change which accounts clients see when they log on to the client portal dashboard. By default, clients see accounts that they viewed recently. Often, however, it makes sense for clients to see all accounts initially so they can choose which account to focus on.

If you selected Custom, select the check box next to the account you want shown. Only accounts that were explicitly added to the client portal are available. For instance, in the example below, the Abbott Household was added to the client portal, but some of the direct members for the Abbott Household are not available because they haven’t been added to the client portal.
See the Client Portal Through the Mobile App
The mobile app makes the client portal available on any device. For more information about the mobile app, see Learn More About the Tamarac Mobile App.
Custom Email Signature
Allows you to automatically add the name of your firm for branding purposes and to ensure the email is identified as a valid message from your firm—preventing confusion if clients are receiving an email from an employee they are unfamiliar with. We recommend using the User Name merge field along with the Custom Signature field (for example: UserName on behalf of YourFirm).
In most cases, you'll want to select the Use Default check box. For more information, visit Customize the Automated E-mail Messages that Advisor View Sends.
Send New Client Email
Select this check box if you want Advisor View to send an email with a temporary password to the client. Those of you who use single sign on (your clients are authenticated for Advisor View when they sign into your website), may not want to send the new client email because your clients don't need the temporary password. In this case, clear this check box.
This option may not appear for most users—in which case you won't be able to deactivate the new client email and it will be sent automatically.
Require Dual Factor Authentication
For more information, visit Require Challenge Questions or Mobile Phone Codes to Sign In.