 Back
Back Home > Advisor View > Clients and Client Portals > Client Portals > Setting Up Client Portals > Client Views > Create a Client View
|
Back |
Home > Advisor View > Clients and Client Portals > Client Portals > Setting Up Client Portals > Client Views > Create a Client View
|
Create a Client View
|
|
A client view allows you to customize a client portal view. You can select the reports and program areas that your clients will be able to access—they won't be able to access any information other than that which you provide to them. You can customize access to not only the specific reports you share with them, but also the granular display of those reports such as the specific columns of data you expose and any indexes of comparison.
You can create as many client views as you want. You can have one client view for each client (although we don't recommend it) or you can have a single client view for all your clients.
To set up your client view, we recommend you do it in this order:
Create your site theme. Themes allow you to change the colors and options used in the pie charts, bar charts, and line charts on your reports and dashboards. You can also use site themes to customize the look and feel of the menu bar for you as well as your clients. You can have different site themes for each of your clients or different groups of clients. Unlike PDF themes, site themes apply to dynamic reports, PDF reports, client portals, and mobile app. For details, visit Site Themes.

Create your dashboard tiles. Dashboard tiles are snapshots of report information that are used on the dashboard, so your client can get at-a-glance information about his or her portfolio. A tile is created from report information, such as return information, benchmarks, withdrawals, sales, etc. You create the dashboard tiles first and then add them to your dashboard.

Customize Key Pages of the Client Portal. You can customize the look and feel of certain pages of the client portal. If you plan to include these pages in your client view (which most do), you'll need to spend some time fine-tuning them. These pages include: the Accounts page, the Assets and Liabilities page, Dashboard page, Document Vault page, and Service Team page. Visit each of these pages and put your finishing touches on our default settings.
Create Your Reports. Each client can access any report you pre-configure for them, such as holdings, performance and allocation reports. Before you can permission these reports to your clients, you'll want to spend some time setting up these reports before adding them to your client view. For more information on creating client portal reports, visit Reports Pages.
Once you've completed the steps above, you're ready to set up your client view.
To create a client view, follow these steps:
On the Client Reporting menu, click Client Views. In the Select a Client View list, click New.
In the Client View Name box, type a name for the client view. This name will not be visible by the client. If you'll use multiple client views in your firm, it's best to be specific.
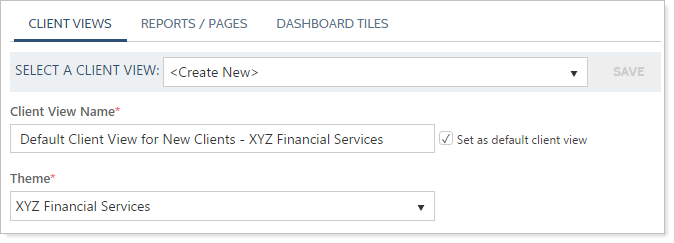
In the Theme box, choose the site theme you want for your client view. Themes allow you to change the colors and options used in the pie charts, bar charts, and line charts. You can also use site themes to customize the look and feel of the menu bar for you as well as your clients. Unlike PDF themes, site themes apply to dynamic reports, PDF reports, client portals, and mobile app. If you haven't created a theme, visit Site Themes.
Under Client View Options, select the check box for Allow clients to export report data if you want the Export Data button to be available on the reports for the client view. The Export Data button allows clients to export their reports to an Excel format.


In the Select Pages section, choose the pages you created for the key areas of the client portal: Accounts, Assets and Liabilities, Dashboard, Document Vault and Service Team. You do not need to select a page, but you must select a page for at least one of the options - for example, you don't need to have an Accounts page, Document Vault page, Dashboards page, and Service Team page; however, you must have at least one of the four pages added to the client view.

In the Select Reports section, choose the reports you want to be available under the Reports menu for the client view. Any report that's added to the dashboard as a full report will be added by default.
If you modify the Dashboard that is included in a client view, the pages added or removed will automatically be added or removed from the views that use that dashboard. If you remove a dashboard from a client view, the report pages that were added because of the dashboard become unlinked, but remain in your client view. They can then be manually removed.
For more information on creating reports, visit Reports Pages.

Click Save.
To delete a client view, follow these steps:
On the Client Reporting menu, click Client Views.
In the Select a Client View list, click the client view you want to delete.

Click Delete. If the Delete button does not appear, it's in use by a client.
To make a copy of a client view, follow these steps:
On the Client Reporting menu, click Client Views.
In the Select a Client View list, click the client view you want to copy.
In the Client View Name list, type a name of the new client view.

Click Save as New.
To assign a client view to a client, follow these steps:
On the Accounts menu, click Clients/Client Portals.
Click the Client Name where you want to assign a client view.
On the Client Portal tab, choose the client view in the Client Desktop View list.
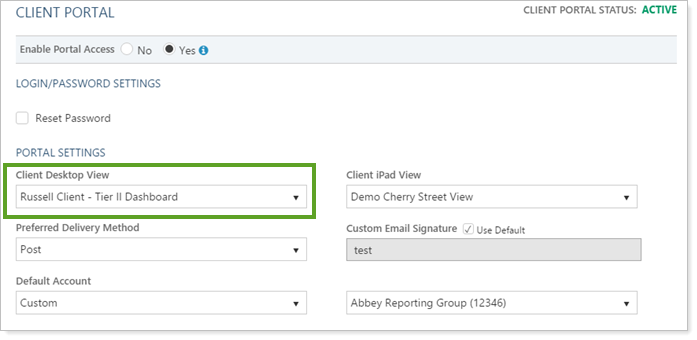
Click Save.
To edit an existing client view, follow these steps:
On the Client Reporting menu, click Client Views. In the Select a Client View list, click the client view you want to edit.
Make the necessary changes and then click Save.
Before activating a client view for a client, you'll want to test it thoroughly. To do this, you'll need to assign the client view to an internal client and then preview it as a client. We recommend creating an "internal client" for testing purposes, such as using your business address (but one that isn't already used to sign into Advisor View).


