
Contents
|
|

Introduction
A billing group is a collection of accounts that all have the same billing settings. In the billing group, you specify details such as the accounts in the group, billing periods, payment distribution, adjustments, and statement display options.
A billing group can include both regular accounts and partial ownership accounts.
important
With ownership accounts added to billing groups, it is easy to inadvertently double bill. Review ownership account and billing group behavior carefully adding partial ownership accounts to a billing group.

Create a Billing Group
Create a Billing Group Manually
To create a billing group manually:
-
On the Billing menu, click Billing Groups.
-
Click Create Billing Group.
-
In the Billing Group Name, type a name for the billing group.
-
On the Accounts tab, add accounts to the billing group that will be used to calculate the rate tier or will pay part or all of the bill for an account.
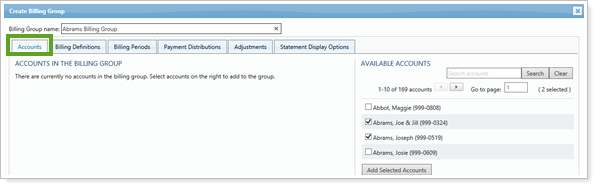
-
Add an account to a billing group. To add an account to a billing group, under Available Accounts, select the accounts you want to add to the billing group, and then click Add Selected Accounts. The list includes both regular accounts and partial ownership accounts.
-
Search for an account to add to a billing group. To search for a specific account, type the search term in the Search Accounts box, and then click Search.
-
Remove an account from a billing group. To remove an account from a billing group, click Remove.
-
Exclude an account from billing. Select this check box if you want to exclude the account from being billed as a part of a billing group and you want to exclude the account value from determining the rate tiers.
For example, select this check box if the only reason you added the account to the billing group was to use it as a payment account.
-
-
On the Billing Definition tab, choose the billing definition you want to assign to the billing group and then click Add Billing Definition. You can add multiple billing definitions to the billing group. If you haven't created a billing definition, visit Billing Definitions.
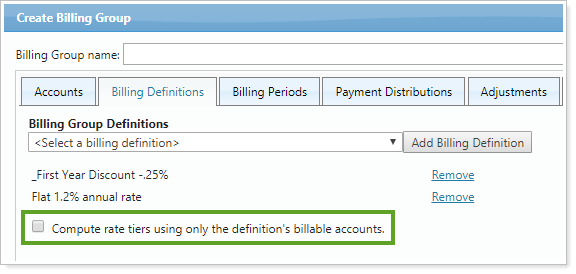
The Compute rate tiers using only the definition's billable accounts check box allows you to adjust to the gross bill amount for accounts not billed in those definitions based on category weighting to produce an accurate bill.
-
When this option is cleared, the rate tiers will be determined by the billable values for all billing group members. This is the current behavior.
-
When the option is selected, the rate tier evaluation will only consider the billable values for members that are assigned to that definition.
-
-
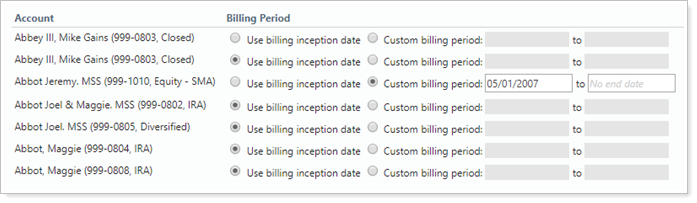
On the Billing Periods tab, choose a billing period for each account assigned to the group.
| Field... | More information... |
|---|---|
|
Use billing inception date |
Select this option if you want to set the billing start date as the date that the account was created. The billing inception date is determined by the billing inception date specified in PortfolioCenter. |
|
Use custom billing period |
This setting allows you to set the billing period. Best PracticeLeave Billing Period set to Use billing inception date.
|

-
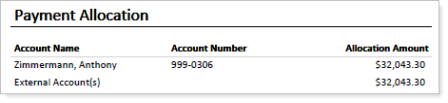
On the Payment Distribution tab, choose the accounts responsible for paying the account balance. Payments can be distributed across accounts based on a dollar amount, percentage, or the remaining unpaid bill portion. If the client pays the fee by check, choose <Direct>. This omits that amount owed from the custodian export.

Example
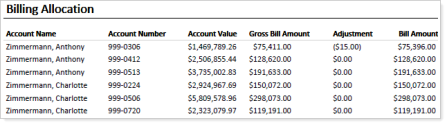
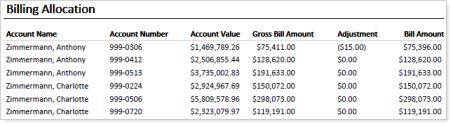
Let's say a parent wants to pay 50 percent of his or her child's bill. You can specify that the parent pays half of the bill and the child will pay for the remaining balance.
In the example below, Michel Abbey will pay 50 percent of Georgia Abbey's bill.

| Field... | More information... |
|---|---|
| Payment Distribution list |
Choose the account or accounts responsible for paying the account balance. Payments can be distributed across accounts based on a dollar amount, percentage, or the remaining unpaid balance. You can specify up to four decimal places for the percentage. To add an additional payment account, click Add Account.
|
| Pays |
Type the amount or percent for the payment distribution. You can specify the amount in dollars or as a percentage. If specifying a percentage, be sure the total percentage adds up to 100 percent.
|
| Remaining balance |
Select this check box if you want the selected account to pay the remaining balance of the bill.
|


-
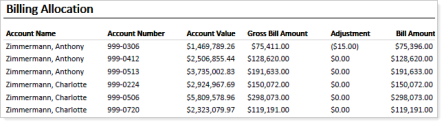
On the Adjustments tab, add any discounts or billing adjustments for the billing group or the individual accounts assigned to the billing group—for example, you can give all accounts assigned to a billing group a new client discount of 10 percent.
If you want to provide an introductory rate to certain clients, you can specify an expiration date for billing adjustments. For example, let's say you want to give new clients a 15 percent discount for three months. To do this, type the expiration date for the discount in the End date box.
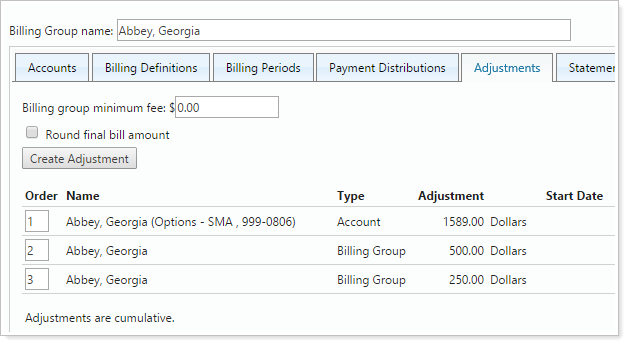
You can add as many adjustments as you want. For example, a client can receive an ongoing 5% group level adjustment for every new financial account consolidated to the firm, plus a one-time $500 group adjustment for the consolidation.
| Field... | More information... |
|---|---|
| Billing group minimum fee | You can set the minimum fee amount for a billing group. If the fee is less than this amount, Advisor View will automatically assign the fee listed in this box. If the accounts are new accounts, Advisor View will automatically prorate the minimum fee. |
| Round final bill amount |
Select this check box if you want Advisor View to round the total bill amount. When selected, Advisor View will automatically round amounts between 1 and 49 cents down to the next dollar and automatically round amounts between 50 and 99 cents up to the next dollar. |
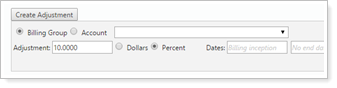
| Create adjustment |
Click this button to create an adjustment.
When you click this button, the following options appear:
|
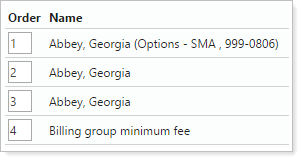
| Order |
Use the Order boxes to prioritize the execution of the adjustments and billing group minimum fee within your account and billing group adjustments. Items at the top of the list have a higher priority.
|


-
On the Statement Display Options tab, choose how you want the billing statement to appear for the accounts assigned to the billing group.
Click Upload.
| Field... | More information... |
|---|---|
| Compare reporting group with |
Choose Billing accounts or Payment accounts. |
| When all billing accounts are in the reporting group, show |
If you select Detail, Advisor View will print details about billing accounts on the billing statement when all billing accounts are in the reporting group. Advisor View pulls the reporting group information from your portfolio accounting system.
If you select Summary, Advisor View will not print any client information for payment accounts on the billing statement when all billing accounts are in the reporting group. Advisor View pulls the reporting group information from your portfolio accounting system.
|
| When some billing accounts are in the reporting group, show |
If you select Detail, Advisor View will print details about billing accounts on the billing statement when some of the accounts are in the same reporting group. Advisor View pulls the reporting group information from your portfolio accounting system.
If you select Summary, Advisor View will not print any client information for payment accounts on the billing statement when some of the accounts are in the same reporting group. Advisor View pulls the reporting group information from your portfolio accounting system. |
| When no billing accounts are in the reporting group, show |
If you select Detail, Advisor View will print details about billing accounts on the billing statement when none of the accounts are in the same reporting group. Advisor View pulls the reporting group information from your portfolio accounting system.
If you select Summary, Advisor View will not print any client information for payment accounts on the billing statement when none of the accounts are in the same reporting group. Advisor View pulls the reporting group information from your portfolio accounting system. |
| Aggregate accounts not in the reporting group |
Select this check box if you want to combine the accounts that are not in the reporting group into a single line item on the report. |
-
Click Save.
Create a Billing Group via Upload
To create a billing group using an upload, generate a standard bulk upload that includes the following data sets:
-
Billing Group Information data set. This set must include at least the following columns:
-
New Billing Group Name: This is the name of the new group you are creating.
-
Billing Definition: The billing definition must be included or the upload will fail. Other billing group settings can be added but are not required.
-
-
Billing Group Accounts upload data set. This set must include at least the following columns:
-
Billing Group Name: This name should match the New Billing Group Name you set in the Billing Group Information data set.
-
Account Number or Upload ID: The account number of all the accounts you want to add to the group.
-
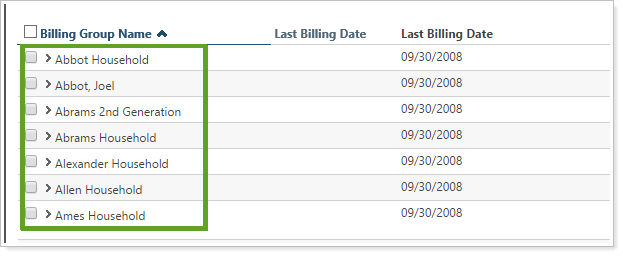
Find Specific Billing Groups
If you have many billing groups, you can create report views to filter the billing groups page to show only groups useful to you. You can combine multiple filters to narrow results further.
The filters are applied to accounts within the billing group, and for each filter use an OR logic. This means that billing groups containing any account matching the criteria will be displayed in the results.
Example
If you add a report view that filters for custodian, you will see a list of all billing groups that contain even one account that has that custodian assigned.
The following filters are available:
Edit an Existing Billing Group
To make changes to an existing billing group:
-
On the Billing menu, click Billing Groups.
-
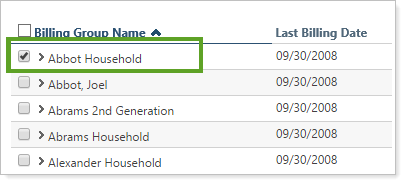
In the list of billing groups, click the group you want to edit.
-
Make the necessary changes to the billing group and then click Save.
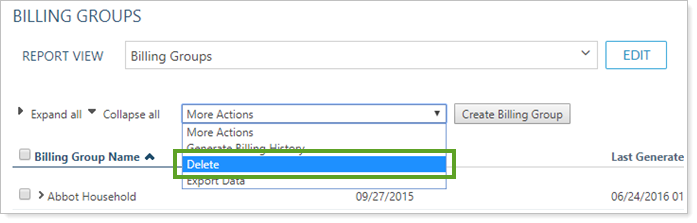
Delete a Billing Group
To delete a billing group:
-
On the Billing menu, click Billing Groups.
-
In the list of billing groups, select the check box to the left of the group you want to delete.
-
In the More Actions list, click Delete.
Generate Billing History
For more information on generating billing history, visit Generating Billing History.