
Contents
|
|

Introduction
When you have large amounts of data to update, you can download the data, modify it in Microsoft Excel, and upload it back into Advisor View. For example, let's say you want to change the primary advisor and benchmark information for several accounts. Instead of editing the accounts one by one, you can download a bulk report of the accounts, make your changes, and then upload it back into Advisor View.
Important
Never upload blank rows for a column, unless you want to intentionally clear out the data.
Advisor View supports the following types of upload data sets:
| Account Billing Payout Distributions | Bulk update the payee, payout date, payout percentage, or other payout distribution-related settings. |
Account Capital calls |
Bulk update capital call amount, date, symbol, and account number. NoteIf no call date is included for the account in the upload, the security's call dates will be used. |
| Account Committed Capital |
Bulk update committed capital details, including the committed capital amount, account number, and symbol. |
| Account Excluded Securities | Bulk update accounts to mark securities as included or excluded from either performance or billing. |
| Account Information |
Bulk update general information about the account, such as benchmarks, address sync from the Household, objective, billing inception date, net worth category, and more. NOTEIf an account does not have a primary Household assigned and you set the Use Primary Household Address column to Yes, the check box will be selected, and the account's mailing address field will be left blank. |
| Billing Definition Information | Use this upload data set to create new definitions or update existing definitions. |
| Billing Definition Rate Tiers | Use this upload data set to create the rate tiers for your billing definitions. |
| Billing Group Accounts | Assign accounts to billing groups in bulk and set common properties. |
| Billing Group Adjustments | Create billing adjustments and discounts for billing groups and accounts. |
| Billing Group Information | Use this data set to create billing groups or make changes to existing ones. |
| Billing Payment details | Include payment status (Unpaid, Partially Paid, or Paid) and add a reconciliation note. |
| Billing Prior Outstanding Balance |
Include the current prior outstanding balance for the account and billing group. For more information on prior outstanding balance, see Add Prior Outstanding Balance to Billing Statements. |
| Capital Call Dates | Add capital call dates to a manual security marked as committed capital securities. |
Client Information |
Update client email, first, middle, and last name, Household, and a variety of other data available in on the Client panel. Includes MoneyGuidePro client category, if MoneyGuidePro integration is enabled for your firm. |
Household asset and Liability Values |
Allows you to add manual assets in bulk, including asset/liability type, description, balance or value, and Household. |
Household assets and Liabilities |
Add manual assets and liabilities in bulk, including Household, description, type, primary owner email, category, and ownership type. NOTEDoes not include value. Use a Household Asset and Liabilities Value upload to add value. |
| Household Information |
Upload information about the Household, such as addresses, logo, upload IDs, service team, custom fields, and more. NoteWhen creating Households by upload, use the following order:
|
| Household Members | Upload information about the members assigned such as membership type, the primary Household of each member, the include in performance/reporting flags, general account information, and more. |
| Manual Security Snapshots | Allows you to bulk upload Manual Security Snapshot data. |
| Ownership Distribution | Allows you to upload information related to ownership. |
| Reporting Group Direct Members | Assign direct members to reporting groups. |
| Reporting Group Information |
Update reporting groups or make changes to existing ones, including address sync from Household, notes, description, performance calculation, benchmarks, and more. Must be uploaded with reporting group direct members. NOTEIf a reporting group does not have a primary Household assigned and you set the Use Primary Household Address column to Yes, the check box will be selected, and the reporting group's mailing address field will be left blank. |
| Security Categories | Add categories and category types to securities and specify the order in which categories appear. |
| Security Category Weights | Add a percentage allocation and primary designation to categories associated with specific securities. |
| Security Information | Add new securities in bulk and update information about any security, including benchmark, bond ratings, category, annual income, and more. |
| Target Allocation | This data set allows you to create the target allocations. |
| Target Allocation Components | Create categories and targets and assign them to a target allocation that you created. |
| Transactions | This data set allows you to indicate whether a transaction is an intra-group flow. |
| Uploaded Search | Upload a custom saved search— you'll overwrite any previous uploaded search when you upload. The upload can include any of the following data, in any order, for each account: Group Name, Account Number, and Upload Account ID (this data is available on the Account Information bulk report). |
When uploading data, you have two options: upload an existing CSV file or copy and paste the contents of an existing file into Advisor View. Before uploading system data, you'll need to format your file to meet Advisor View data specifications. Once you've properly formatted the data, you can upload it to Advisor View.

Preparing the Upload Data Set File
To create the data set file you want to upload, it's best to create an Excel spreadsheet that contains the information you want. To determine the columns to add to the spreadsheet, you can check out the Data Specifications page. This page lists the required and optional fields for each upload data set.
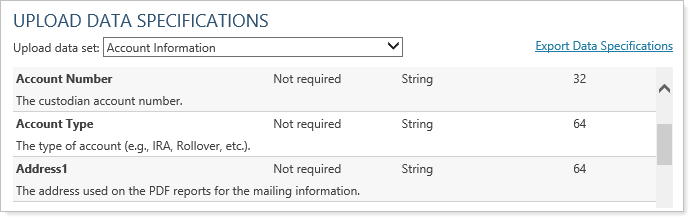
To get to the Data Specifications page, on the Setup menu, click Upload and then click Data Specifications.

The data specifications page lists the following information:
| Field | More Information |
|---|---|
| Field Name | The name of the field you can upload into Advisor View. It's best to add this name as the column heading in your Excel document. |
| Field Condition | Determines if the field is required or not required. If Required conditionally appears, the field is a required field. If Not required appears, the field is NOT required. |
| Data Type |
The data field type:
|
| Size | The maximum number of characters. If a value does not appear in this column, you can specify as many characters as you want, unless the field is a Yes/No field. |
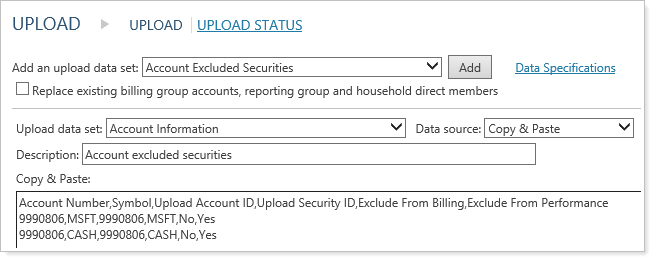
After you've looked at the data specifications for each data set, you can build your Excel file. In the picture below, CASH is being excluded from billing and MSFT is being excluded from performance.

Once you've created the upload file, save it as a CSV file.
Uploading Data Sets
To upload data into Advisor View, you have two options: upload an existing CSV file or copy and paste the contents of an existing CSV file into Advisor View. Before uploading system data, you'll need to format your file to meet Advisor View data set specifications. Once you've properly formatted the data, you can upload it into Advisor View.
Important
Never upload blank rows for a column, unless you want to intentionally clear out the data.
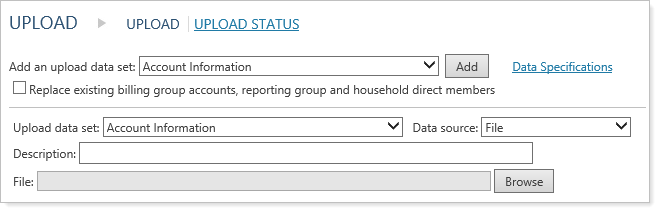
Upload a csv File
To upload an existing CSV file into Advisor View:
-
On the Setup menu, click Upload.
-
In the Add an upload data set list, click the type of data set you want to upload and then click Add. Repeat this step for each data set you want to upload.
NOTE
When uploading the Reporting Group Direct Members and the Billing Group Accounts upload data sets, you will see a Replace existing billing group accounts, reporting group, and household direct members check box. When selected, all existing direct members for reporting groups or accounts for billing groups will be replaced by the uploaded direct members or accounts. If you do not select this check box, the uploaded direct members/accounts will be added to the reporting group/billing group and existing assigned direct members/accounts will not change.
-
In the Data source list, click File.
-
Click Browse. Locate the file you want to upload and then click Open. Repeat this step for each data set you want to upload.
-
In the Description box, type a description for the upload data sets and then click Upload. The data set has been uploaded into Advisor View.
Copy & Paste the Contents of a CSV File
To upload a file by copying and pasting the contents of an existing file:
-
Open the file that contains the formatted data that you want to upload. Make sure there are no blank rows, unless you want to clear existing data. Blank rows will overwrite any existing content.
-
Press Ctrl+A to select all data and then press Ctrl+C to copy the data.
-
In Advisor View, click Upload on the Setup menu.
-
In the Add an upload data set list, click the type of data set you want to upload and then click Add. Repeat this step for each data set you want to upload.
-
In the Data source box, click Copy & Paste.

-
In the Copy & Paste box, press Ctrl+V to paste the contents of the CSV file into the box.
-
In the Description box, type a description for the upload data sets and then click Upload. The data set has been uploaded into Advisor View.
Check the Status of an Uploaded Data Set
After you've uploaded a data set, visit the Upload Status page to synchronize the accounts and view and address any upload errors. The page lets you know if there were any errors during the upload.
To get to the Upload Status page, click Upload Status on the Setup menu.

For each data set you've uploaded, the Upload Status page shows you the number of records processed and the number of warnings and errors that occurred. If a data set contains errors or messages, click the hyperlink to view more information.
An error indicates that the data wasn't accepted. A warning indicates the upload at least partially succeeded, but there were issues you might want to be aware of. If errors or warnings aren't addressed, this can cause clients' accounts to have incorrect values.
The following are some common reasons why you might see upload errors and warnings:
-
Unknown accounts can cause errors. This may be because the particular account doesn't exist in Advisor View or hasn't been created in Advisor View yet.
-
Unknown securities can cause errors. If the security isn't yet recognized in Advisor View yet or if a typo caused the error, this needs to be resolved because the value of that security isn't reflected in account holdings until the error is resolved.
-
Data specification errors can cause errors or warnings. For example, if a field contains more characters than Advisor View allows, this can cause an error or warning.
-
Typos in column headers can cause warnings. Tamarac ignores columns with headers that don't match the upload data specification. As a result, if you make a typo in a header, the upload may be reported as successful, but you may not realize that some of the data wasn't uploaded. Look for warnings to indicate when invalid column headers caused data to be omitted from an upload data set. This allows you to go back and correct header typos to make sure all the entire upload data set uploads successfully.
For example, doing an Account Information upload with Account Number, First Name, and Last Name columns, you accidentally misspell Last Name as Lsat Name. Tamarac uploads the Account Number and First Name data, ignoring the Lsat Name column entirely. In this case, Tamarac reports the upload succeeded, but you'll see a warning that the Lsat Name column was omitted.
If you see errors or warnings you cannot resolve, contact Tamarac service to resolve these issues so that account values are accurately reflected.
Tips for Uploading Data Sets
Creating Groups
-
Two upload data sets are required: Reporting Group Information and Direct Members for Groups
-
The group must be uniquely identified
-
Upload New Group Account ID is safest
-
Description may be used (this will set the default value for Display Preference and will become the “Group Name”)
-
Display Preference + associated fields (e.g., Description) may be set to identify the “Group Name”
-
“Group Name” is an acceptable column in Direct Members upload data set if unique
-
Best Practices
-
Update and create groups separately
-
If unique, Account Number and Symbol are easiest. Otherwise use Upload Account ID and Upload Security ID
-
Use four-digit years in dates
-
Never upload blank rows for a column, unless you want to intentionally clear out the data.
Items you can’t update with bulk data uploading
-
Direct member sort order, Include in PDF, or Master Account ID
-
Advisors (only primary advisor)
-
Manual performance settings
-
Account number for single accounts
-
Include in Advisor Rebalancing
-
Security Groups
Primary Advisor
-
If the advisor is already assigned to the account/group, only the checkbox for “Primary Advisor” will be updated
-
If the advisor is not already assigned to the account/group, the advisor will be added and marked as the primary advisor
-
If the primary advisor column is blank, all advisors will be marked as non-primary for the account/group
-
This will never delete advisors assigned to the account/group
Bond Ratings
-
If uploading a bond rating, the corresponding effective date must be included as a column
-
If the effective date is blank, this defaults to “inception” for the security
Group name
-
Used for identification purposes in the “Direct Members for Groups” upload data set only and may not be updated