
Contents

Introduction
When it comes to billing statements, customization is essential since confusing bills can create a serious drag on support resources. The statement customization options in Advisor View are flexible enough to meet the needs of nearly any advisory firm.
Billing statement customization gives you these powerful features:
-
Remove or Reorder Sections. You have complete control over the sections in your statements and the order in which they appear. For example, you can completely remove gross fee calculation from your billing statements.
-
Add or Remove Columns. Add or remove any column you want, such as asset range or annual rate. It's up to you!
-
Include Custom Text. You can add custom text anywhere on your billing statements—and add conditional text that will only appear if there is no direct payment account. For example, you can include text that instructs the client where to mail the payment.
-
Show Non-Billable & Total Value. You have the choice to show non-billable and total account value on your billing statements to give the client a complete picture of their portfolio.
-
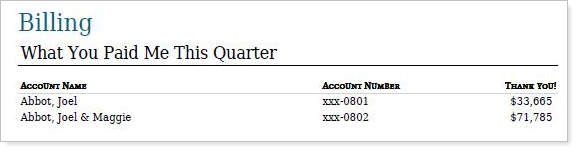
Show Outstanding balances. You can include outstanding balances on clients' billing statements so that you can notify them of any overdue payments. If you generate more than one statement (e.g., for two billing groups or two billing definitions) you can show combined outstanding balance amounts. This will help your clients clearly determine the total amount that is due to your firm.
-
Show or Hide Adjusted Rates. Choose whether the Adjusted Rate displays on billing statements. This is especially helpful when a Reporting Group contains only a subset of the Billing Group’s accounts and a PDF is generated from the Reporting Group.
-
Track Managed and Unmanaged Account Values. Displays the total managed or unmanaged account values of the underlying accounts within the billing definition.
-
Rename Columns. Rename any column heading you want. For example, you can rename flow amount to deposited/withdrawal amount.
-
Customize the Direct Bill terminology. Choose the terminology you want to use for direct bills on your billing statements. For instance, if clients frequently interpret the default direct bill label to mean that the money is coming directly from an account, you could change it to Pay By Check.
-
Dynamically Label Billing Definition Sections. For firms that apply multiple billing definitions to one billing group, it's important to differentiate billing definitions. The {Billing Definition Description} merge field dynamically populates invoices with the appropriate billing definition description, making it easier to tell billing definitions apart.
You can also change the billing inception date and closed date for any account, if the dates you're seeing appear to be inaccurate.
Note
When running a PDF report with a billing section, billing will not run if the Billing closed date is on or before date the report is run.

Add a Billing Statement to a PDF Report
To add a billing statement section to a PDF template:
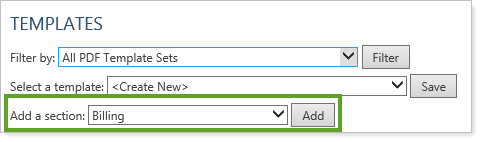
-
On the Client Reporting menu, under PDF Templates, click Templates.
-
In the Select a template list, choose the template where you want to add the billing section. If you haven't created a template, click Create new template.
-
In the Add a section list, choose Billing and then click Add.
-
Complete any of the following settings in the General Statement Display Options section:
This setting... Does this... Theme Specifies the look and feel of many global items in your reports, such as colors, number precision, display of negative numbers, and more. Page 1 Header and Footer You can specify a unique header on the first page of your billing statements. With this feature, you can add the address to the mailing header and mail only the billing statement to the client—without printing a separate mailing label. For more information on configuring headers and footers, visit Headers & Footers. Use annual rate Select the Use annual rate check box to show the annual rate instead of the rate for the billing period.
Example
Let's say you bill quarterly at a rate of .25 percent.
If you do not select the Use annual rate check box, your statement would look like:

If you select the Use annual rate check box, your statement would look like:

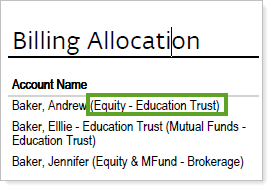
Display billing start date as one day after the billing period start date Select this check box if you want to show the billing start date as the day after the billing period start date. Include account type with account name Select this check box to show the account type after the account name that appears on the billing statement.
Always show totals row Select this check box to include a totals row for Billing Definition, Billing Allocation, or Payment Allocation sections, even if the grouping only includes one account. Direct bill text Enter the terminology you want to use for direct bills on your billing statements. For instance, if clients frequently interpret the default "direct bill" label to mean that the money is coming directly from an account, you could change it to "Pay By Check."
Indicate beneficial billing rate tier treatment You can customize your billing statements to show which accounts have a better billing rate (for example, your ERISA accounts). The breakpoints for these accounts will be different than the breakpoints for your other accounts.
When you select this check box, the beneficial billing rate accounts will be marked with an asterisk on the billing statement.
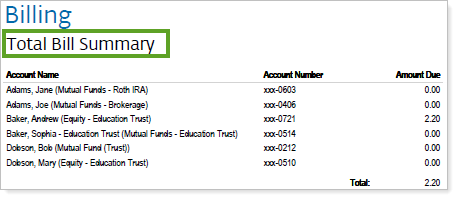
Beneficial billing rate tier treatment footnote text Type the text you want included in the footnotes. This field is only available if you selected the Indicate beneficial billing rate tier treatment check box. Include total bill summary Select this check box if you want to add a billing summary section to your billing statement. If you select this option, additional options appear for customizing the summary section.

Total bill summary title If you selected the Include total bill summary check box, type the title you want to appear for the summary section.
Total adjustment summary title If you selected the Include total bill summary check box, type the title you want to appear for the adjustment summary section.
Available/Selected columns Choose the columns you want to appear in the summary section.
-
Under Detail Statement Display Options, choose the sections, titles and columns you want to appear on the billing statement.
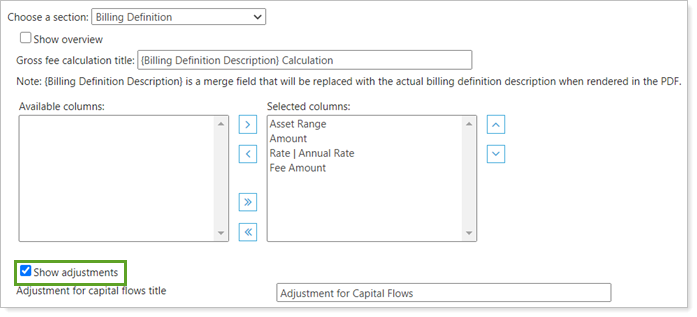
If you want to include details about billing adjustments on your billing statement, click the Show adjustment details check box, or the Adjustments check box for the Billing Definition section.
You can choose from the following sections:
Billing Definition.
Note
For billing groups with multiple billing definitions, use the merge field {Billing Definition Description} in the Gross fee calculation title. This merge field dynamically populates invoices with the appropriate billing definition description.
If you don't see {Billing Definition Description} automatically in the Gross fee calculation title, add it with the following steps:
Manually add the {Billing Definition Description} merge field to the Gross fee calculation title.
Generate a billing history for the account or group.
Generate a new PDF billing statement.
Group Summary.
Billing Allocation.
Note
To see adjustments made to accounts within a billing group, add the Adjustment column.
Adjustments made to the billing group are always displayed.
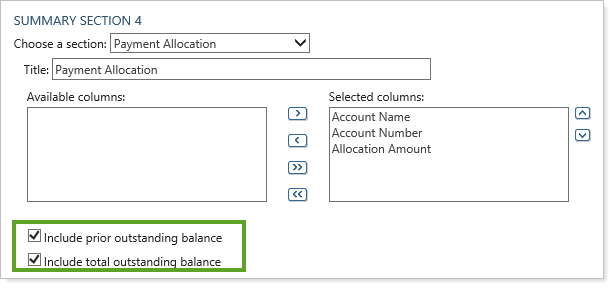
Payment Allocation. When you select this option, you can include outstanding balance information on your billing statements.
Note
If the billing allocation matches the payment allocation for all accounts, the Payment Allocation section is excluded from the statement.
Because of this, billing statements may vary between billing periods or billing groups.
You can choose from the following check boxes:
Include prior outstanding balance. Includes only the outstanding balance from the last billing statement, based on the outstanding balance included in your Billing Prior Outstanding Balance upload. If there is no outstanding balance, a zero dollar amount is shown.
Note
Advisor View does not roll forward unpaid balances. Prior outstanding balance is based on the outstanding balance you upload for invoices.
Include total outstanding balance. Includes the total outstanding balance across all prior statements. If there is no outstanding balance, a zero dollar amount is shown.
For more information on prior outstanding balance, see Add Prior Outstanding Balance to Billing Statements.
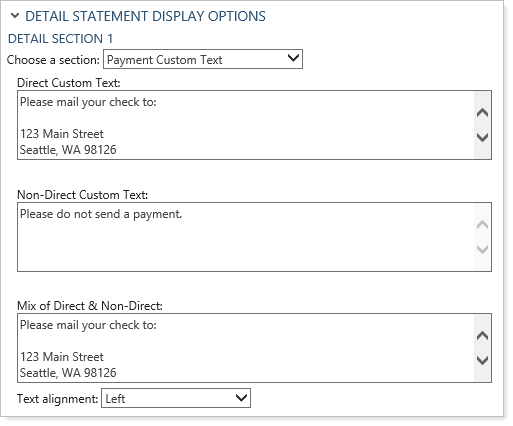
General Custom Text.
Payment Custom Text. When you select this option in the list, you can enter your custom text in the following boxes:
Direct Custom Text. This text will appear on the billing statement for direct accounts only.
Non-Direct Custom Text. This text will appear on the billing statement for non-direct payment accounts only.
Any Direct Custom Text. This text will appear when you have a mix of direct and non-direct accounts.
-
Under Summary Statement Display Options, choose the summary sections you want to appear on the billing statement.
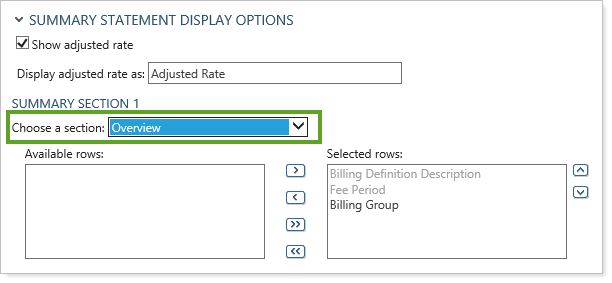
The Show adjusted rate check box gives you the option to hide the Adjusted Rate on billing statements so clients won't see a calculation that may confuse them. This is especially helpful when a Reporting Group contains only a subset of the Billing Group’s accounts and a PDF is generated from the Reporting Group.
You can track managed and unmanaged account values on the billing statement by selecting the following columns:
-
Managed Account Values. Displays the total managed account value of the underlying accounts within the billing definition.
-
Unmanaged Account Values. Displays the total unmanaged account value of the underlying accounts within the billing definition (unmanaged is defined as unmanaged for performance).
You can choose which columns will display in your summary, and you can also include Prior Outstanding Balance and Total Outstanding Balance in this section so you can see the combined amounts for the statements generated and help your clients clearly determine the total amount that is due to your firm.
NOTES
These balances will be shown on the billing summary page if you run a billing PDF section at the reporting group level and your reporting group generates more than one statement (e.g., for two billings groups or two definitions).
-
-
Click Save.
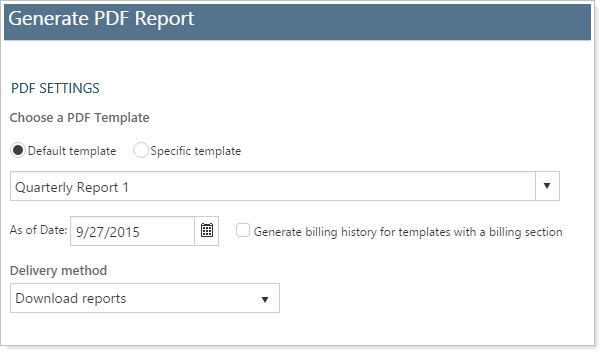
Generate a Billing Statement
Before running a billing statement, you must perform the following:
To generate a billing statement:
-
On the Accounts page, select one or more billing groups where you want to run a billing statement.
-
In the Actions list, click Generate PDF Report.
-
In the Select a template list, choose the template where you've added billing information. If you haven't added billing information to a template, visit Add billing to a PDF template.
-
Click in the As of date box, and use the calendar to select the beginning billing date.
-
In the Delivery Method list, click either Download reports or Post reports to clients. If you select Download reports, all generated reports will be available for you to download on the PDF Report Status page at your leisure or immediately if you only selected one account or group. If you select Post reports to clients, the generated reports will be posted to the appropriate client portals if the portal accounts have been set up. If a generated report cannot be posted to a client portal, the generated report will be available on the PDF Report Status page.
-
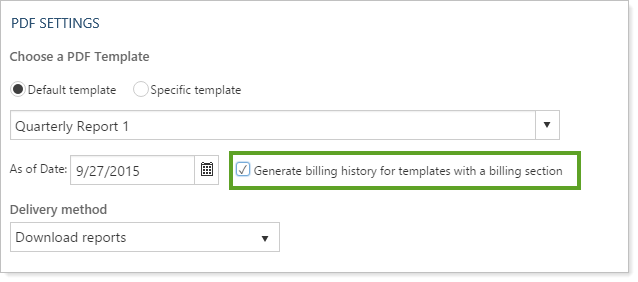
If you know the account does not have billing history generated, click the Generate billing history for templates with a billing section check box. However, the recommended workflow is to generate billing history on the Billing Groups page before printing the statement. If you generate it here, there's a chance you could accidentally overwrite existing billing history. We have included alerts to help reduce this possibility. For details on generating billing history, visit Generating Billing History.
-
Click Generate Report.
-
If you are generating a single report to download, it will be immediately available in Adobe Reader® or Adobe Acrobat®. If you are downloading multiple reports, your report will be available on the PDF Report Status page. Here you will be able to download a .zip file containing all the reports you generated as well as view the status of the download.
-
On the PDF Report Status page, Completed will appear in the Status column when Advisor View is finished generating the reports. If you selected a large number of accounts, processing may take a few minutes. If Advisor View is not finished generating the report, Processing will appear in the Status column. To update the status of the report, click the Refresh Status link at the top of the page.

-
When the Status column changes to Completed, expand the template report you just generated, then expand the Reports section to access the reports.
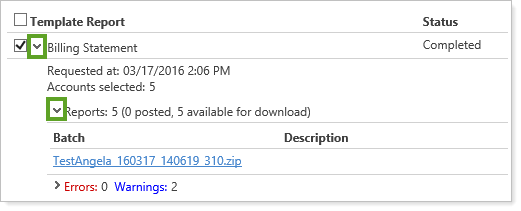
-
Click the link to download reports. If you are generating a billing statement for more than one account, Advisor View will create a ZIP file that contains the statements you generated.
-
If you generated reports for more than one account, in the Save As dialog, choose a location to save the ZIP file, and then click Save. When the download is complete, double-click the file you saved.
-
Double-click the billing statement file you want to view, and a PDF report appears on your screen. You need Adobe Reader or Adobe Acrobat to view the reports.

Reprinting a Billing Statement
Have you ever accidentally re-run billing statements when you generated a PDF report mid-cycle? Or wanted an exact copy of a historical billing statement that was sent to your client? With Advisor View, you can now generate a PDF without affecting billing.
To reprint an billing statement, print the billing statement as you always do (without generating billing history first). For the As of date, type the date that you generated billing history and leave the Generate billing history for templates with a billing section check box unselected. You can find the date that you ran billing history on the Billing History report.
