 Back
Back Home > Advisor View > Accounts, Groups & Households > Accounts > Creating and Maintaining Accounts > Maintaining Accounts: The Billing Settings Panel
|
Back |
Home > Advisor View > Accounts, Groups & Households > Accounts > Creating and Maintaining Accounts > Maintaining Accounts: The Billing Settings Panel
|
Maintaining Accounts: The Billing Settings Panel
|
|
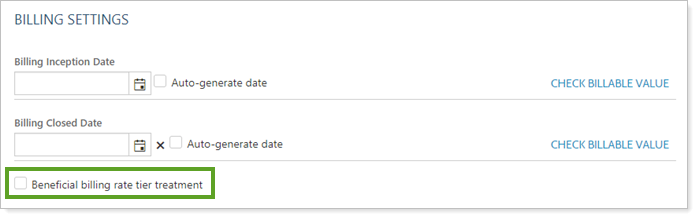
The Billing Settings panel allows you to set billing inception dates and determine the beneficial billing rate tier treatment, if desired.

This Help topic discusses only the fields on the Billing Settings panel, available under the Settings tab when you edit an account. For more information on editing accounts, including how to navigate to this panel, visit Maintaining Accounts in Advisor View.
See below for descriptions of each of the settings on the page.

Use this setting to designate what date you want to use for the billing inception date. To set the billing inception date, you have the following options:
Enter a manual inception date. Type in or choose from the calendar the date you want billing to start. When you compute dates, you can click the Check billable value link to see the values immediately. This is useful if you have a manual adjustment you need to make that is based on the inception date. You can then enter the adjusted date in the Billing inception date box.
Auto-generate the inception date. Select the Auto-generate date check box to have Advisor View automatically compute the billing inception date so you won't have to worry about a misalignment of billing inception dates and the performance inception dates used on your billing statements.
The following table summarizes the billing inception date configuration options and what you get with each:
| Billing Inception Date | Auto-Generate Date | Result |
|---|---|---|
| Blank | Cleared | Billing inception date follows the account's performance inception date. |
| Blank | Selected | Billing inception date is based on the first day value appears in the account. |
| Manually entered | Not available | You cannot select Auto-generate date when you manually set the billing inception date. |
For more information on setting the billing inception date, see Set an Account's Billing Inception Date and Closed Date.

Use this setting to designate what date you want to use for the billing closed date. To set the billing closed date, you have the following options:
Enter a manual closed date. Type in or choose from the calendar the date you want billing to end. When you compute dates, you can click the Check billable value link to search for the last billable value. You can then enter the adjusted date in the Billing closed date box.
Auto-generate the closed date. Select the Auto-generate date check box to have Advisor View automatically compute the billing closed date so you won't have to worry about a misalignment of billing closed dates and the performance closed dates used on your billing statements.
For more information on setting the billing closed date, see Set an Account's Billing Inception Date and Closed Date.
When you select this check box, you indicate that the account uses a beneficial billing rate (for example, your ERISA accounts). The breakpoints for these accounts will be different than the breakpoints for your other accounts. You can customize your billing statements to show these accounts.
On the Billing Settings panel, you can view payout distributions already set up for the account and add, edit, or delete payout distributions.
Payout distributions can be added at the account level and, optionally, at the user level. They are used to keep track of where revenue goes within your firm. With payout distributions, you designate how much of the revenue from the billed amount goes to the advisor, the firm, a third party like the custodian, or any other recipient. Then you can view the resulting revenue data in the dynamic Firm Revenue report.

By default, 100% of the payout distributions are set to the firm. When you designate other payout recipients, their payout distributions are subtracted from that 100% total, and the firm receives whatever portion is left.
This section discusses account-level payout distributions. To learn more about user-level payout distributions, see User Management.
To learn more about why you would set up payout distributions on the account level versus on the user level, see Setting Up Payout Distributions.
If you already have payout distributions designated at the user level, both the account-level and user-level percentages will be applied. For more information, see Setting Up Payout Distributions.
To create a new payout distribution:
On the Accounts menu, click Accounts.
Open the account.
Under the Settings tab, click Billing.
In the Payout Distribution section, click Create Distribution.

Configure the Create Payout Distribution settings.
Click Create.
To create payout distributions for many accounts at once:
Export an Account Billing Payout Distributions bulk report. For details on using bulk reports, see Bulk Reports.
In the bulk report CSV file, change the settings you want to edit in bulk. Settings available for edit via upload are detailed in the following table.
| Setting | Details |
|---|---|
| Upload ID | This is the unique ID required to correctly match data in uploads. |
| Account Number | This is the custodian account number and can be used in place of the Upload ID to match data in uploads. |
| Payee Type |
This setting allows you to designate in general who is receiving the payment. You can set this to:
|
| Payee |
This setting allows you to designate the exact payee.
For more information, see Payee. |
| Payout Effective Date | This setting designates the date the payout distribution settings should go into effect. |
| Payout Effective Since Inception |
This setting allows you to designate the payout distribution scheme as applicable from the inception of the account onward.
|
| Payout Percentage | This setting designates the percentage paid to the specified payee, effective as of the payout date. |
On the Setup menu, under Data Management, click Upload.
Create an Account Billing Payout Distributions upload. Add your edited Excel file or data. For more information on uploads, see Bulk Data Uploading.
Click Upload.
To edit an existing payout distribution:
On the Accounts menu, click Accounts.
Open the account.
Under the Settings tab, click Billing.
In the Payout Distribution section next to the distribution you want to edit, click Edit.

Configure the Edit Payout Distribution settings and click Save.
To delete an existing payout distribution:
On the Accounts menu, click Accounts.
Open the account.
Under the Settings tab, click Billing.
In the Payout Distribution section next to the distribution you want to delete, click Delete.


