 Back
Back Home > Advisor View > Clients and Client Portals > Common Customer Service Requests > Post a PDF Report to a Client Portal
|
Back |
Home > Advisor View > Clients and Client Portals > Common Customer Service Requests > Post a PDF Report to a Client Portal
|
Post a PDF Report to a Client Portal
The document vault allows you to share PDF reports generated within Advisor View directly to your clients' portals.
If you want to know how to post external files, see Post Documents, Reports, and Other Files to Client Portals.
To post a PDF report to a client portal:
On the Accounts menu:
Click Accounts if you want to run a report at the account or group level.
Click Households if you want to run the report at the Household level.
If you want to post a document that isn't a PDF report, use the Clients/Client Portals Actions list. For more information, see Post Documents, Reports and Other Files to Client Portals.
Select one or more record that you want to generate a report for, and in the Actions list, click Generate PDF Report.

Select an option for your template:
Click Default template to assign a default PDF template to each account or group and generate the default template, then choose a template from the list. You can find more information about default templates at Assign Default Templates Using PDF Template Types.
Click Specific template to choose another template, then select the template type and then specific template in the drop-down lists. You can find more information about PDF report templates at Create and Edit a PDF Template.

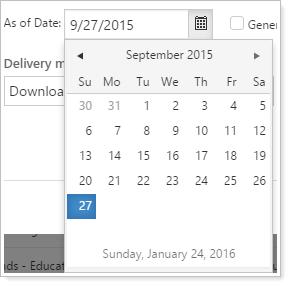
Click the As of date box. In the calendar that appears, click an end date for the report. This date will be used on all accounts and households you selected.
In the Delivery method list, click Post reports to clients.
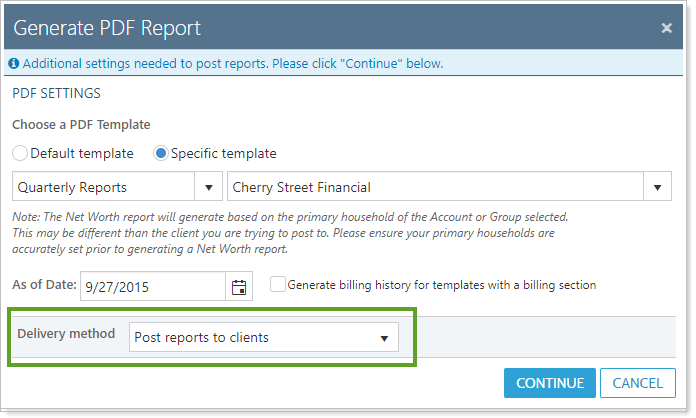
Click Continue.
Complete any of the following configuration options,which are available for the Post reports to clients option:
| Setting | More Information |
|---|---|
| File description | Type the description for the file; this communicates to your client the nature of the posted document. This text is fully searchable. |
| Folders | For higher-level or broader file organization, choose a folder from the list of existing folders to file the report in. The report can only be stored in one folder at a time. For more information on folders, see Manage Folders. |
| Labels | Choose a label for the report, if applicable. For more information on labels, see Manage Labels. |
| Post reports to clients with access to |
If you are creating a report for a group, select the level of access that a client will be required to have to see the report posted to their portal.
|
| Send notification email to users |
Select this check box if you want the posted document to be accompanied by an email announcement. For more information on customizing the emails that Advisor View sends, visit Customize the Automated Email Messages that Advisor View Sends. |
| Post announcement to users |
Select this check box if you want the posted document to be accompanied by an announcement that appears on the client’s portal dashboard. In the end date box, choose the date when the announcement will be removed from the client portals. If you leave this field blank, no end date will be used and the client will have to manually remove the announcement. In most cases, it's best to specify an end date. For more information on announcements, visit Announcements. |
Click Generate and Post Reports. For more information about documents you have posted, including how to delete documents from both your document vault and the client portal document vault, see Use the Document Vault.
