
Contents

Introduction
You can use announcements to post news, statuses, and other short bits of information you want to share with your clients. Your posted announcements will appear as notifications on the menu bar, so they're easily visible as soon as your client signs in and on all pages in Advisor View. Click the notification icon to see the list of announcements.

Announcements are an efficient way to communicate with your clients. For example, you could post an announcement to let your clients know that you're out of the office or that the market is closed on a particular day. You can choose whether to give your clients permission to delete announcements.

Create and Post an Announcement
To post an announcement to a client portal:
-
On the Accounts menu, click Clients/Client Portals.
-
Select the check boxes next to the clients who you want to post the announcement to.
-
In the Actions list, click Post Announcement.
-
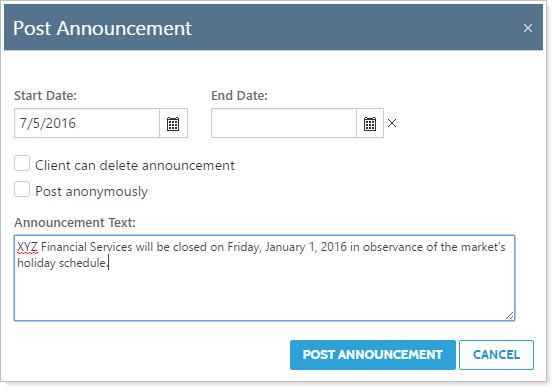
Complete the following information:
| Setting | More Information |
|---|---|
| Start date | The date you want the announcement to appear on your client portals. You may want to schedule these announcements ahead of time – for example, you can enter all announcements for dates when your office will be closed. |
| End date |
The date the announcement will stop being displayed on the client portals. If you leave this field blank, no end date will be used and the client must manually remove the announcement. In most cases, it's best to specify an end date. When you set an end date, the announcement will expire at the end of the selected day—not at the beginning of the day. |
| Client can delete announcement |
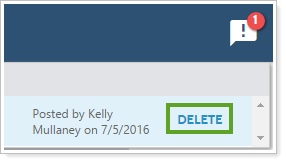
When you select this check box, the client can remove the announcement from the Dashboard page of the client portal. A Delete link will appear next to the announcement, as shown below.
If you do not select this check box, the Delete Announcement link will not appear. In most cases, it's best to select this check box. |
| Post anonymously |
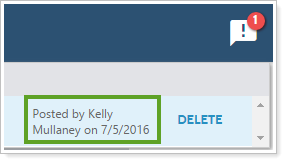
Select this check box to post the announcement so that it does not appear as specifically posted by you. You might use this for general announcements that are not directed at any specific client, or if the clients who will view the announcement all work with different advisors in your firm. If you clear this check box, the "posted by" information will be included below the announcement.
|
| Also post to all future clients |
Select this check box if you want Advisor View to automatically post this announcement to all future clients. This is helpful if you send "welcome to the firm" messages to new clients. If this option is not available, you must select all clients in your firm – it will not appear if you only select a few clients. |
| Announcement text | Type the text you want to appear on the announcement. You cannot insert HTML in these text boxes. Please enter plain text only. |
-
When finished, click Post Announcement. To see how the announcement looks, you can view the client’s portal. For more information, visit View a Client Portal Exactly As Your Client Sees It.
Edit an Announcement
To make changes to an existing announcement:
-
On the Client Reporting menu, under Client Portal Settings, click Announcements.
-
Click Edit next to the announcement you want to modify. You may not see Edit links for announcements that you did not create.

-
Make the necessary changes to the announcement.
| Setting | More Information |
|---|---|
| Start date | The date you want the announcement to appear on your client portals. You may want to schedule these announcements ahead of time – for example, you can enter all announcements for dates when your office will be closed. |
| End date |
The date the announcement will stop being displayed on the client portals. If you leave this field blank, no end date will be used and the client must manually remove the announcement. In most cases, it's best to specify an end date. When you set an end date, the announcement will expire at the end of the selected day—not at the beginning of the day. |
| Client can delete announcement |
When you select this check box, the client can remove the announcement from the Dashboard page of the client portal. A Delete link will appear next to the announcement, as shown below.
If you do not select this check box, the Delete Announcement link will not appear. In most cases, it's best to select this check box. |
| Post anonymously |
Select this check box to post the announcement so that it does not appear as specifically posted by you. You might use this for general announcements that are not directed at any specific client, or if the clients who will view the announcement all work with different advisors in your firm. If you clear this check box, the "posted by" information will be included below the announcement.
|
| Also post to all future clients |
Select this check box if you want Advisor View to automatically post this announcement to all future clients. This is helpful if you send "welcome to the firm" messages to new clients. If this option is not available, you must select all clients in your firm – it will not appear if you only select a few clients. |
| Announcement text | Type the text you want to appear on the announcement. You cannot insert HTML in these text boxes. Please enter plain text only. |
-
When finished, click Save.
Delete an Announcement
To delete an announcement:
-
On the Client Reporting menu, under Client Portal Settings, click Announcements. You may only see Delete links for announcements that you created.
-
Click Delete next to the announcement that you want to delete.
-
On the Are you sure you want to permanently delete this announcement dialog, click Delete.
Post an Announcement When Generating PDF Reports
To add an announcement when you generate your PDF reports and post them to your client portals:
-
On the Accounts menu, click Accounts or Households - depending on the relationship for which you want to generate the report.
-
Choose the accounts, groups or Households where you want to generate reports.
-
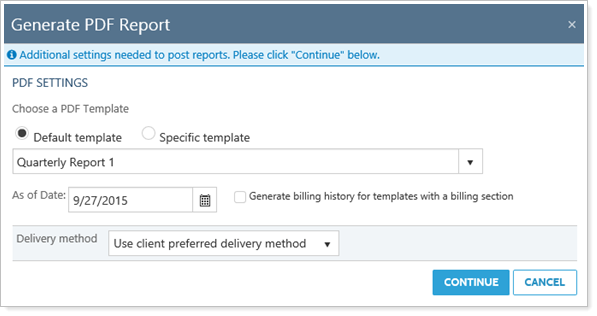
In the Actions list, click Generate PDF Report.
-
In the Delivery Method list, choose the method you want, keeping in mind that at least one report must be posted for a client portal.
-
Click Continue.
-
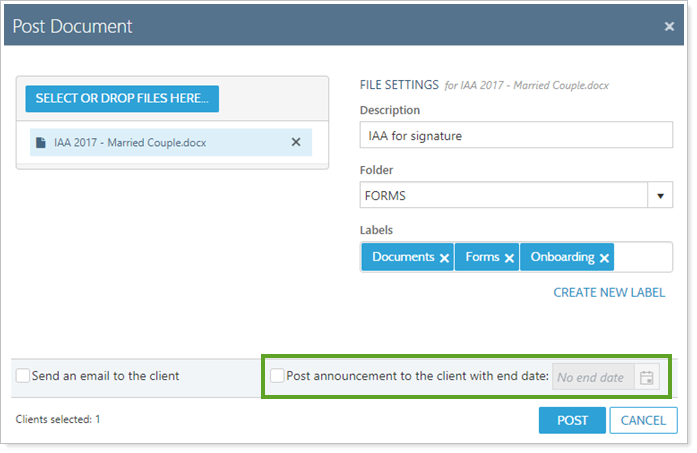
Select the check box next to Post announcement to users with end date. This option does not show if you selected Download reports for the delivery method.
-
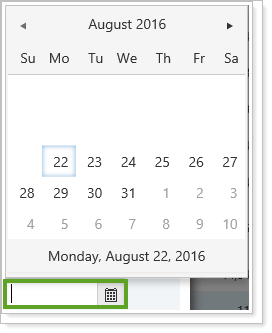
If you want an expiration date for the announcement, add an end date for the announcement in the field next to Post announcement to users with end date. The announcement is then automatically removed on that date, and you don’t have to remember to go back and manually delete it. If you leave the box blank, no end date will be used and the client must manually delete it.
-
Click the Generate Reports button—note that the name of this button may vary depending on the delivery method you selected. To see how the announcement looks, you can view the client’s portal. For more information, visit View a Client Portal Exactly As Your Client Sees It.