
Contents
|
|

Introduction
Creating and changing new models within Advisor Rebalancing can be done visually through the Models menu. While this option is good for one-time changes and additions, sometimes bulk changes and additions are needed. In this case, you can save time by using the Upload feature to create new models and change existing models.
Uploading models information allows you to make significant changes to models, or upload several models all at once. This can be done easily with a two-step process:
-
Create and Download a bulk report. A bulk report of your existing model information gives you the correct data specifications information and allows you to make multiple changes at once in a spreadsheet instead of individual changes on the Security Level Models page or the Allocation Models page.
-
Upload your changes. After making changes, you can then upload the information using the Upload feature.
Best Practice
Make model changes before rebalancing accounts assigned to that model. Saving models also saves the accounts associated with that model. If the accounts were rebalanced previously that day, run the rebalance again in order to incorporate new model changes.

Step 1: Create and Download a Bulk Report
The first step to uploading a model is to first create the raw data in a format suitable for upload. Generally, the easiest way to accomplish this is to create and download a bulk report and use that report to upload your model changes or new model.
While you have the option of using data specifications to define your heading names, you can also download a bulk report, showing your model information for easy updates.
Create Data for a New Model
To create a new model by upload, follow these steps:
-
On the Upload menu, choose Data Specifications.
-
On the Upload Data Set list, choose your preferred data set to see the specifications for each column of data you'll be uploading.

Note
To create Security Level models, use the Create Security Level Model data set. To create Allocation models, use the Create Allocation Model data set. For more information, see Data Specifications.
-
Using a spreadsheet program, use the field names and guidelines to build your new model.

Note
If total weight of all submodels or securities within your model does not equal 100%—a total of 1 on a spreadsheet—the model can still be uploaded but any remaining percentage will be allocated to cash. For example, if you upload a Security Level model where the securities add up to 70% allocation, the remaining 30% of the model will be allocated to cash.
Modify Data for an Existing Model
The easiest way to modify an existing model through upload is to generate a bulk report for your models and use that data to guide your changes.
To download the correct bulk report in order to make model changes, follow these steps:
-
Determine which data set you'd like to use to update your models. Here are available data sets related to models:
Data Set Name Available Fields Account Alternate Security Sets -
AlternateSecuritySetName
-
SecurityLevelModelName
UniqueAccountId Allocation Model Members -
AllocationModelName
-
SubModelName
-
Weight
-
MaxWeight
-
MinWeight
-
Rank
-
SortOrder
Alternate Security Set Settings -
AlternateSecuritySetName
-
SecurityLevelModelName
-
TargetType
Alternate Security Sets -
AlternateSecuritySetName
-
SecurityLevelModelName
-
Ticker
-
Weight
-
LegacyPositionFlag
-
MaxWeight
-
MinWeight
-
Rank
Create Allocation Model -
AllocationModelName
-
AvailableToAssignFlag
-
ProspectFlag
-
UseRanksFlag
Create Security Level Model -
SecurityLevelModelName
-
AvailableToAssignFlag
-
ProspectFlag
-
UseRanksFlag
Model Priorities -
AssetLocationPreference
-
Priority
-
SecurityLevelModelName
-
AllocationModelName
-
NotAvailableForInvestment
Securities in Security Level Model -
SecurityLevelModelName
-
Weight
-
Symbol1
-
Symbol2
-
Ticker
-
LegacyPositionFlag
-
MaxWeight
-
MinWeight
-
Rank
Substitute Securities -
Weight
-
Cusip
-
SubstituteCusip
-
SubstituteTicker
-
Ticker
-
Rank
Note
The most commonly used data set to upload new and change existing Allocation models is the Allocation Model Members data set. For Security Level models, the most commonly used data set to upload new and change existing Security Level models is the Securities in Security Level Model data set. For more information, see Data Specifications.
For more information on finding data set information, see Data Specifications.
-
-
On the Reports menu, click Bulk Reports.
-
Using your preferred data set, create a bulk report. Full instructions on how to do this can be found on Create, Edit, and Delete Bulk Reports.
-
Download the report locally. Full instructions on how to do this can be found on Create, Edit, and Delete Bulk Reports.
-
After downloading your bulk report, make any needed changes locally to your models within the spreadsheet.
Example
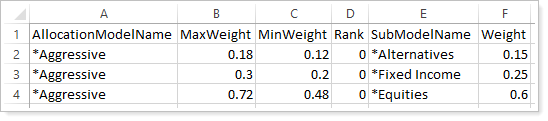
You are going to change the weights of the submodels within your Aggressive Allocation model. First, you download the Allocation Model Members bulk report and view the report locally within your spreadsheet software:
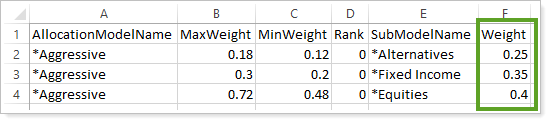
Next, make changes to the weights as needed:
Note
If total weight of all submodels or securities within your model does not equal 100%—a total of 1 on a spreadsheet—the model can still be uploaded but any remaining percentage will be allocated to cash. For example, if you upload a Security Level model where the securities add up to 70% allocation, the remaining 30% of the model will be allocated to cash.
Step 2: Upload Your Changes
Once you've defined the data set you'll be using and you've downloaded your preferred bulk report, you can now make changes to your models and then upload those changes.
Best Practice
-
If this is your first time uploading data, contact Tamarac support for help and to verify you're completing the process correctly.
-
Once you upload changes to any model, these changes cannot be reversed. After you download a bulk report of existing models, keep a copy without any changes in case you upload any incorrect changes. You can revert any errors by uploading your unchanged copy of the bulk report.
To upload a new model or upload changes to your existing model, follow these steps:
-
On the Upload menu, click Upload.
-
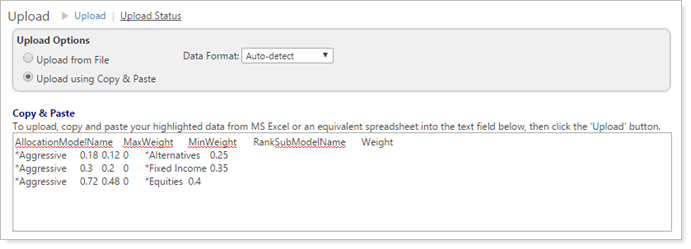
Choose Upload using Copy & Paste. Copy the bulk report you changes from your spreadsheet and paste into the Copy & Paste area. For full instructions on uploading data, see Uploading Data.
-
Click Upload.
-
On the Upload menu, click Status. On the Upload Status page, verify your upload was added without errors or warnings. If there are errors or warnings, check them carefully and upload the data again with corrections, if needed. For more information, see Upload Status and Troubleshooting.