
Contents

Introduction
After you've sent ETF and equities trades to Advisor OMS, and those trades have been completed with the broker, the next step in the process is allocating the trades. The allocation process ensures that the ETF and equities are placed in the correct accounts, that the broker and custodian have the correct data in their systems. Once allocation is complete, you can start the reconciliation the next day.
The allocation process allows you to correctly allocate combined and split orders in the correct accounts, as well as verify any fees were applied correctly. You can trade in multiple ways throughout the day, but the allocation process for all Advisor OMS orders is the same at the end of the day.
The allocation process is a simple process:
-
Filled trades. The broker fills or partially fills your orders and you receive notification that orders are completed.
-
Allocate. After the orders are filled, the allocation process begins. You can choose to allocate any partially filled orders either random or pro rata. These are then sent and then accepted by the broker.

-
Allocation Status. Once allocations are complete, the Allocation Status column will reflect this.
Best Practice
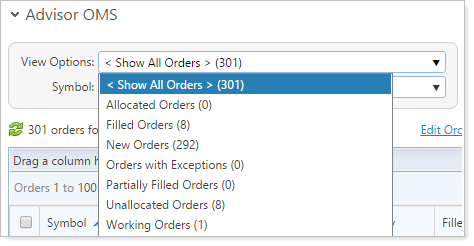
Filter your view of the Advisor OMS page using the View Options list. This allows you to only see orders in specific statuses.
For more information, see Introduction to Advisor OMS.
After orders are complete, bulk reports allow you to report on and keep track of trades exclusive to Advisor OMS and aid the reconciliation process. For more information on reporting in Advisor OMS, see Reporting in Advisor OMS.

Allocation Groups
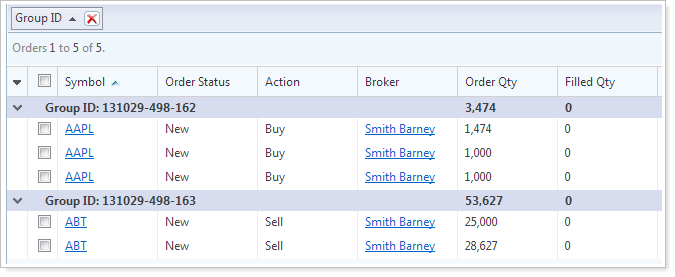
Advisor OMS allows you to split or combine orders before they are sent to the broker, allowing you to get favorable pricing with grouped orders or separate large orders of lesser-traded securities. For all trades, Advisor OMS assigns a Group ID to both the original and new orders when split or to combined orders.
In order to easily view which trades belong to an allocation group, add the Group ID column to the Advisor OMS page. Drag the column header in to the grouping section in order to view the trades together in their groups. Once you've grouped the page by Group ID, information on the Allocations dialog will be shown for the entire group, as well as the individual order that was selected. You can get to the Allocations dialog by clicking a ticker.
For more information on grouping, see Introduction to Advisor OMS.
Allocation Processes
Use the following steps to complete Advisor OMS allocations.
Submit Allocations
When allocations are submitted, the filled quantity of the order will be sent to the custodian in order to allocate the shares to the accounts. Allocations can be submitted for any order that has been partially filled or filled. If the order contains a filled quantity that is greater than the allocated quantity, allocations can be submitted for the order. If the order is fully filled, the entire allocation for the order will be sent.
To submit allocations on Advisor OMS, follow these steps:
-
On the Rebalance & Trade menu, click Advisor OMS.
-
Choose the orders which will be sent for allocation. If an order is part of an allocation group, allocations will always be sent for the allocation group as a whole.
-
In the More Actions list, click Submit Allocations.
-
Choose an allocation method if the order is partially filled.
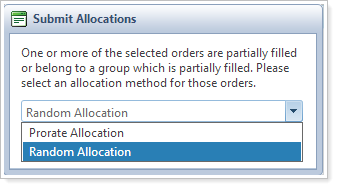
Prorate Allocation. The partially filled shares will be prorated across all accounts in the group, using the following logic:
Shares are first allocated on a pro-rata basis, rounding down, if needed.
For remaining shares, Advisor Rebalancing puts the accounts in order, starting with the account furthest from full allocation and ending with the account closest to full allocation. This is calculated on a percentage basis (Allocated Shares / Allocation Quantity).
Remaining shares are allocated one at a time, starting at the top of the list, until there are no more shares to be allocated.
Random Allocation. The order will be randomly allocated to one account in the group at a time, filling each account until there are no more shares.
Notes
-
When editing allocations, you can specify the quantity for each account by typing the applicable amount in the Order Qty column. However, if by editing the quantities the order amount exceeds the original quantity, a new order will be created.
-
Account holdings will not be verified to ensure that shares and cash are available for trading, so verify that you do not over-trade the account.
Combine & Submit Allocations
You can combine orders that weren't previously combined for trading but would be more efficient to combine for allocation purposes. This is useful when multiple orders have taken place throughout the day but those trades need to be spread across all of the selected accounts.
To combine and submit allocations, follow these steps:
-
On the Rebalance & Trade menu, click Advisor OMS.
-
Select the orders that you would like to combine allocations.
Example
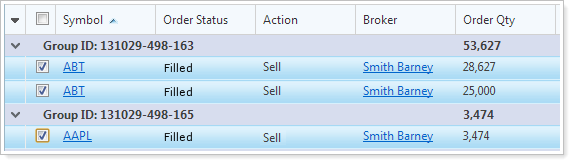
In the picture below, there are three filled orders that are part of two different allocation groups. When it comes time to allocate, all three orders can be combined in to the same allocation group in order to spread the executions across all of the accounts.
-
In the More Actions list, click Combine & Submit Allocations and then click Continue.
-
On the Combine & Submit Allocations window, click Combine & Submit.
Manually Allocate Orders
You can also manually allocate orders. Manually allocating orders means you send those orders to the broker, but you can still track these actions in Advisor OMS.
To manually allocate an order, follow these steps:
-
On the Rebalance & Trade menu, click Advisor OMS.
-
Select the orders which you’d like to manually allocate.
-
In the More Actions list, click Manually Allocate Orders and then click Continue.
-
On the confirmation dialog, click OK.
Allocate a Prime Broker Order
Prime broker trades have to be allocated manually. Because these trades can't be automatically allocated, a bulk report is necessary to complete the allocation process. When prime broker orders are allocated, a bulk report containing the allocation information can be generated at the top of the Advisor OMS page. This file can be used to allocate prime broker orders with the custodian.
Third Party Allocation
You can use a third party to complete Advisor OMS allocations.
Allocate Using an Allocation File
If you use a third party for trade allocations, you can generate an allocation file which you can then export an send to that service for allocation.
To allocate using an allocation file, follow these steps:
-
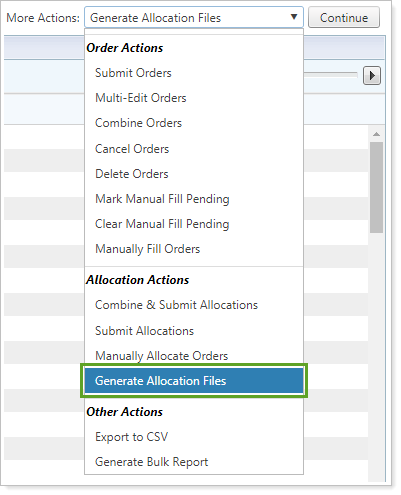
On the Rebalance & Trade menu, click Advisor OMS.
-
Select the orders you'd like to include on the allocation file.
-
In the More Actions list, click Generate Allocation Files and then click Continue.
-
In the Select Allocation File list, select the allocation file and click Generate Files.
This creates a file containing your block and allocation record files.
Third Party Setup Information
For more information on setting up OASYS to work with Advisor OMS allocations, see OASYS in Advisor OMS.