Contents
|
|
Introduction
After you've sent ETF and equities trades to Advisor OMS, and those trades have been completed with the broker, the next step in the process is allocating the trades. The allocation process ensures that the ETF and equities are placed in the correct accounts, that the broker and custodian have the correct data in their systems. Once allocation is complete, you can start the reconciliation the next day.
After orders are complete, bulk reports allow you to report on and keep track of trades exclusive to Advisor OMS and aid the reconciliation process. On the Advisor OMS page, you have the ability to run Advisor OMS bulk reports.
For more information on allocations, see Allocation Processes in Advisor OMS.
Bulk Reports
You can run an Advisor OMS bulk report from any location where bulk reports can be run. If you do not have a date range specified in the bulk report, the report will include all submitted trades for all selected accounts, including deleted trades and all historical trades. The following describes behavior you'll see when you run bulk reports with Advisor OMS data from various places in Advisor Rebalancing:
-
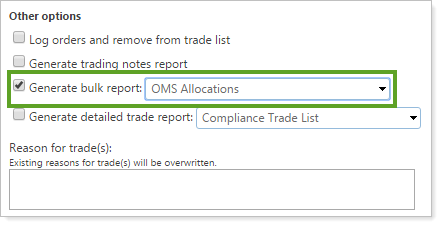
Trade Actions Dialog. If you run the bulk report from the Trade Actions dialog when sending trades from the Trade List as part of your workflow, the report will show the trades you've selected on the Trade List page.

-
Advisor OMS page. If you run the bulk report from the Advisor OMS page, the report will include all trades for the selected accounts, including deleted and historical trades. For more information, see Run a Bulk Report on the Advisor OMS Page.
-
Bulk Reports Page. If you run the report from the Bulk Reports page under Reports, you will first select the template and then the accounts on which to run the report. The report will include all deleted and historical trades. For more information, see Run a Bulk Report on the Bulk Reports Page.
Create an Advisor OMS Bulk Report
Once you create a bulk report on the Bulk Reports page under the Reports menu in Advisor Rebalancing, this report can then be run again on the Bulk Reports page, but can also be run directly on the Advisor OMS page. For more information on this method of running a bulk report, see Run a Bulk Report on the Advisor OMS Page.
Best Practice
Before creating the report, review data and available columns on the Advisor OMS page to ensure you capture all the relevant trading data in the report.
To create an Advisor OMS bulk report, follow these steps:
-
On the Reports menu, click Bulk Reports.
-
Click Create Report.

-
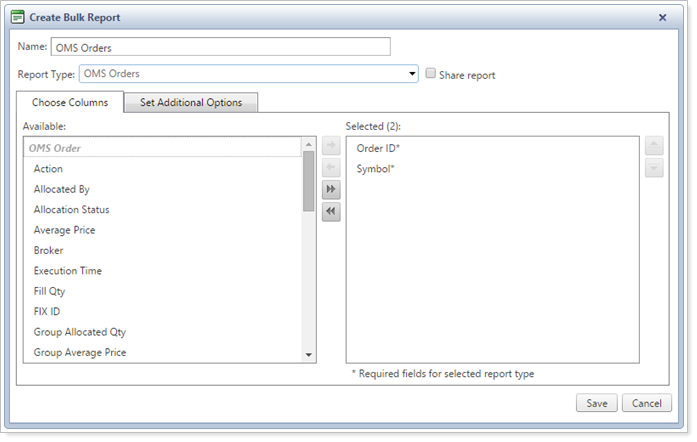
Give the report a title under Name.
-
In the Report Type list, click either OMS Allocations or OMS Orders.
OMS Orders allows you to do audits of volume and see, over time, information about which securities are being traded and which broker they're being traded with.
OMS Allocations allows you to see more account-specific information about Advisor OMS orders.
-
Choose the information that you want to appear on the report. The left Available box shows you the columns you can add to the report. The Selected box shows you the columns that you have added to the report.

To add a column to the report, in the Available box, click the column you want to add and then click
.
To remove a column from the report, in the Selected box, click the column you want to remove and then click
.
To add all available columns to the report, click
.
To remove all columns from the report, click
.
Use the
and
buttons to arrange the columns.
-
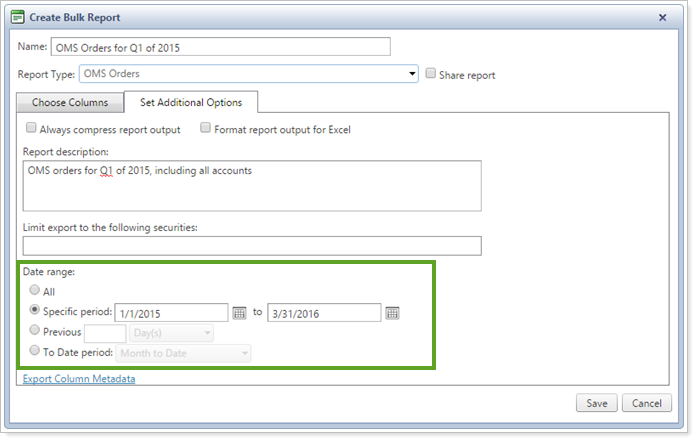
In the Set Additional Options tab, specify the time period for the trade data. By default, the report will display data for all trades.

All. This option shows data for all trades, including all deleted and historical trade data.
Specific Period. If you select this option, type in—or use the calendar control to select—a date range for the report. Trades submitted outside of the specified date range will not be included in the report. Trades submitted on the start and end date of the range will be included.
Previous. Select this option and enter a whole number to choose a specific number of previous days, months, quarters, or years.
To Date Period. Select this option to choose a trailing time period of Month to Date, Quarter to Date, Year to Date, or choose a custom time period with Custom to Date.
-
Enter other report criteria on the Set Additional Options tab you’d like to include. Options include a report description, limiting the report to a set of securities, compressing the report, and formatting the report for Excel.
-
If you want to share the report with other users, select the Share report check box. This will display the report for other users to select.
-
When finished, click Save.
Run a Bulk Report on the Advisor OMS Page
To generate a bulk report from the Advisor OMS page, follow these steps:
-
On the Rebalance & Trade menu, click Advisor OMS.
-
Select the orders for which you'd like to generate a bulk report. You may use the Symbol and View Options fields to filter the results on the page.
-
In the More Actions list, click Generate Bulk Report. Click Continue.
-
On the Generate Bulk Reports dialog, select the bulk report you created, and then click Generate Report.

For more information on creating bulk reports for Advisor OMS, see Create an Advisor OMS Bulk Report.
-
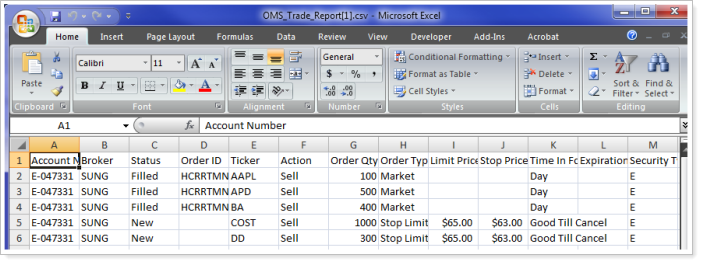
Click the Bulk Report Status link to view the status of the bulk report and download it. The bulk report opens in Microsoft Excel (as a .csv file) and may look like this:

Run a Bulk Report on the Bulk Reports Page
To run a bulk report in Advisor OMS from the Reports menu, follow these steps:
-
On the Reports menu, click Bulk Reports.
-
Find the bulk report you created earlier, and then click Run Report to generate the report or Edit to change the details of the report.
-
Go to Bulk Report Status to view the status of the bulk report and download it when finished. The bulk report opens in Microsoft Excel (as a .csv file) and may look like the following:


