
Contents

Introduction
Advisor OMS lets you to execute ETF and equity trades in real time without leaving the Advisor Rebalancing interface. When enabled, Advisor OMS handles the execution and allocation of the ETF and equity trades you send to it.
Mutual fund trades are still handled through the traditional workflow—as are all accounts not enabled for Advisor OMS—of creating trade files and manually uploading them to the appropriate custodians, or using custodian integrations.


The Advisor OMS Workflow
The overall trading workflow in Advisor OMS remains consistent with what you are familiar with. All trades begin the same way: after rebalancing, custom strategy, and directed trades activity, trades are sent to the Trade List. From there, ETF and equities trades in Advisor OMS-enabled accounts can be traded and then allocated directly in the Advisor OMS system.
Using Advisor OMS is a basic, three-step process:
-
Send trades: In order to use Advisor OMS, you will take eligible trades from the Trade List and send them to Advisor OMS. For more information on the order process, see Trade Processes in Advisor OMS.
-
Submit trades: Once the trades are ready to go to the broker, you will use Advisor OMS to send them to the broker. For more information on the order process, see Trade Processes in Advisor OMS.
-
Allocate trades: Once the trades are completed or partially completed with the broker, they are then sent back to Advisor OMS where you can allocate the trades. For more information on post-trade processes in Advisor OMS, see Allocation Processes in Advisor OMS.
The following visual provides a high-level look at the Advisor Rebalancing trading workflow:
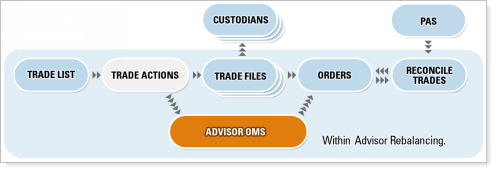
Advisor OMS allows you to complete equities and ETF trades directly in Advisor Rebalancing. Once trades have been submitted, filled, and allocated, they can go through your normal reconciliation workflow.
Customize the Page
Like other pages in Advisor Rebalancing, the Advisor OMS page has several options to customize your view to help you work more efficiently. The following customization options will help you see the information you need to see.
Filter Using the View Options List
You can quickly filter the page by allocated orders, new orders, working orders, and more. To filter the page, click the filter you want in the View Options list.
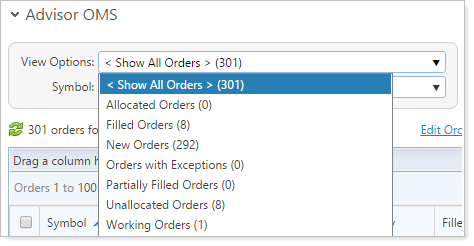
The View Options list contains the following filters:
| Filter | Shows This Information | ||
|---|---|---|---|
| Show All Orders | All orders in Advisor OMS. | ||
| Allocated Orders | Orders with the status of Allocated or Allocations Sent. | ||
| Filled Orders |
Orders where the Order Qty equals the Filled Qty and the status is not Allocated. |
||
| New Orders | Orders where the status is New. | ||
| Orders with Exceptions |
Orders where the order status is one of the following:
|
||
| Partially Filled Orders |
Orders where Filled Qty is greater than 0 and less than Order Qty, and the order status is not Allocated. |
||
| Unallocated Orders | Shows orders where Filled Qty is greater than 0 and the order status is not Allocated or Allocations Sent. |
Add or Remove Columns
To add or remove columns on the Advisor OMS page, follow these steps:
-
On the Rebalance & Trade menu, click Advisor OMS.
-
Click the
 in the lower-right corner to add additional columns to the page.
 -
Choose the columns you want to appear on the page.
To add a column, click
.
To remove a column, click
.
To add all columns, click
.
To remove all columns, click
.
Use the
and
buttons to arrange the columns.
-
When finished, click Save.
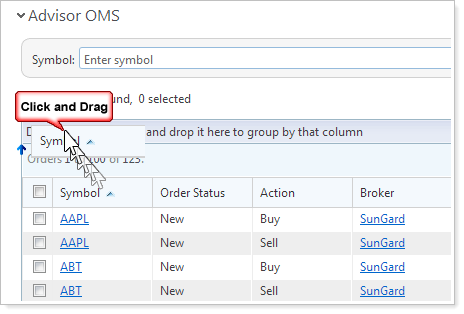
Group Columns
Since the Advisor OMS page lists all trades you sent for trading in Advisor OMS, this can be a long list. To make viewing and using this list easier, you can group the trades by certain kinds of criteria, like symbol, broker, and order status.
To group information by any available column, follow these steps:
-
On the Rebalance & Trade menu, click Advisor OMS.
-
Rest your mouse over the column by which you want to group and your mouse pointer will change to
 .
. -
Press and hold your left mouse button and drag the column heading to the Drag a column header and drop it here to group by that column area. Release the mouse button.
Advisor OMS will group the page by the column you selected. If you don't see the column that you want to group by, click
to add additional columns to the page. -
Add additional column headings, if needed, to further group the page. You can add up to three groupings. To remove a grouping, click
 for the grouping you want to remove.