 Back
Back Home > Advisor View > Clients and Client Portals > Client Portals > Setting Up Client Portals > Customizing the Menu Bar
|
Back |
Home > Advisor View > Clients and Client Portals > Client Portals > Setting Up Client Portals > Customizing the Menu Bar
|
Customizing the Menu Bar
|
|
The top menu bar consists of the primary navigation for Advisor View that holds the menus for Accounts, Reports, Client Reporting, etc. While the names of the menus cannot be changed, you can control the theme of the menu bar elements. You can customize the theme of the menu bar for you as well as your clients - and have different themes for each. For example, you can have one brand for your menu bar and another for your clients or a subset of your clients.

The top menu bar consists of four primary customizable elements:
The menu bar background. This is the background color of the entire menu bar. While the default color is blue, you can change it to any color that matches your firm's brand.
Menu Item Text. This is the text color of the menu items. For this option, you'll want to use a color that contrasts your background color, such as using a white font on a dark background.
Menu Item Background. This is the background color of a menu item. The menu item background color does not have to be the same color as the menu bar background, although in most cases, we believe it looks best when the background colors are the same. The menu item background color only changes the background color behind the menu item. In the picture below, the menu item background color is set to black and the menu bar background color is set to blue.

User Menu Text. This is the text color of the user menu, which appears in the right of the top menu bar. The user menu area contains your name and the as-of date. For clients, it shows their name and the data as-of date.

User Menu Background. This is the background color of the user menu. The user menu item background color does not have to be the same color as the menu bar background, although in most cases, we believe it looks best when the background colors are the same. The user menu item background color only changes the background color behind the user area menu item. In the picture below, the menu item background color is set to black and the menu bar background color is set to blue.

Client Portal Menu Name. This is the name displayed on the client portal. You can choose to display either the first name only, or both first and last name, depending on the tone you want to project. The default setting displays both first and last name.

For each customizable element, you can also control the color of these elements in certain states. The customizable states are:
Hover. Hover is used to change elements when you place your mouse over them.
Selected. Selected is used to indicate what page and/or section the user is currently on. In the video below, the selected color is white. When you click the menu item and the page is loaded, the item will display the selected white state.
For all colors, you can choose the color using our standard color selection tool or you can type an HTML color code (HEX code), such as #FF5733. To choose a color, click the arrow in the box and either enter the hex code for the color you want or drag the sliders to select a color. When finished, click Apply.

To customize the colors of the menu bar, follow these steps:
On the Setup menu, click Themes.
In the Select a site theme list, select an existing theme. Otherwise, choose <Create New> and type the name of the theme in the Site theme name box.

If you want the theme to be for your version of Advisor View, select the Set as my site theme check box. By selecting this check box, any settings on this theme will apply when you sign into Advisor View.
Under the navigation options, use the Default Static Color, Custom Static Color, Default Hover Color, Custom Hover Color, Default Selected Color, and Custom Selected Color columns to change the colors. To change a color from the default, clear the Default Color check box and then select the custom color in the Custom Color column.

For a list of customizable elements, visit Customizable Elements. For the difference between the static color, over color and default color, visit Customizable States. For details on how to use the color selection tool, visit Changing Colors.
You can preview your changes in real-time using the menu bar at the bottom of the Navigation Options section. You can use the Preview list to choose any logo that has been uploaded to Advisor View for you by your Advisor View service team. This may be important if you're creating a theme that you want to match a particular logo.

If you want to reset a custom color back to the default value, simply select the applicable Default Color check box.

Configure any additional settings for the theme, such as the graph options and color options. For more information on configuring your theme, visit Themes. When finished, click Save.
To add the logo, you must send it to your Service Team to upload into Advisor View. When preparing your logo for use in Advisor View, keep the following in mind:
The ideal logo size is 270 pixels by 60 pixels (4.5:1). However, if you provide a logo image at two times the actual display size (i.e. 540 x 120), the logo will look better on high definition monitors—note that although the logo on your menu will stay the same size, it will look larger on your clients' login screens and automatic client portal emails.
The logo should have a transparent background color instead of a solid background color (white, black, etc.). Otherwise the logo will display on a solid-colored field that may not match your menu bar.
![]()
If you have a white logo, you may not want a transparent background. A white logo with a transparent background would be invisible on any page with a white background. Also, the logo assigned to the Household is used for clients' login screens and automatic client portal emails—if you use a transparent background, clients would be unable to see your company logo in these locations because the screen backgrounds are white. In this case, we recommend setting the logo background color to match the color of your menu bar.
The following file types can be uploaded: .BMP, .GIF, .JPG, .JPEG, and .PNG. The recommended file type is .PNG.
If at least one of the logo’s sides (either width or length) meets or exceeds the minimum width requirements, the logo will be automatically resized. In some cases, this may not look as expected, so it's best to format your logo to the ideal logo size specifications.
A 10 pixel margin is added on the left and right sides of the logo. There is no additional margin for the top and bottom of the logo image.
This logo may be the same logo that appears on the Sign In page of Advisor View and the automated email messages Advisor View sends – which have white backgrounds. If you use a logo with a white font, it will not appear on these pages because the background and the logo are the same color.
![]()
You can set up your user information on the My Profile page—adding a photo as well as contact information and custom text that describes your experience, your role, or other information related to you. The photo you add will appear on the menu bar. For details about adding the photo as well as configuring your profile, visit Manage Your Profile Information.

Menu bars are assigned when you assign a client view to a client. For details, visit Create a Client View.
You can customize the menu bar that you see when you sign into Advisor View. To do this, follow the steps in the Customize the Colors of the Menu Bar section. Be sure to select the Set as my site theme check box. Selecting this check box will set the theme as the default for your version of Advisor View.

You can control the tone of your portals by choosing how to display clients' names—either full name or just first name.
The First Name and Last Name fields must be filled in on the Client Profile tab of the Client panel to use this customization.

To modify the name displayed in the portal:
Under Setup, click System Settings.
Scroll down to the Client Display Configuration setting.
Select from the list the desired name display configuration.
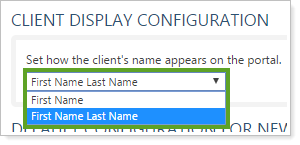
Click Save.


