
Contents

Introduction
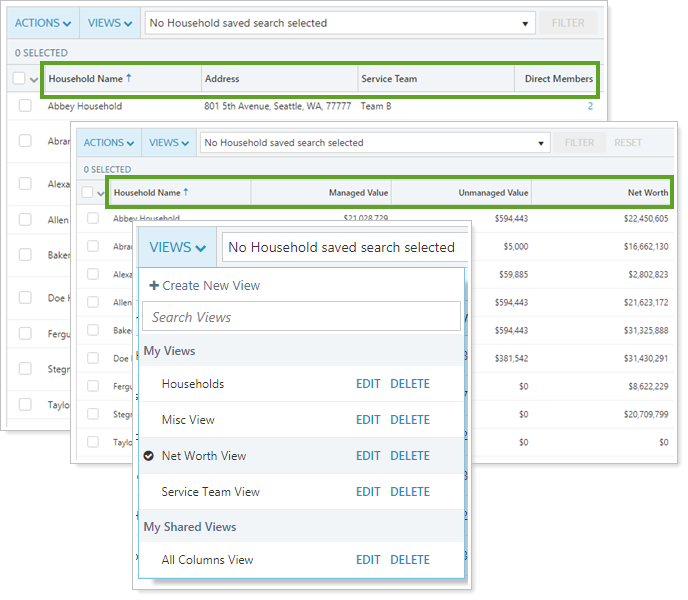
Page views are pre-configured views of the Accounts, Households, or Securities page. With views, you can create several customized views of your data—and even choose which columns that appear—so that you can make more informed decisions. For example, you may create one view on the Accounts page that filters out closed accounts, and another that contains closed accounts. On the Households page, you could create one view that shows address and service team, for administrative tasks, and another view to show net worth.
To use custom views, users must be enabled with views-related permissions under User Management.

Create a View
To create a view:
-
Open the grid page you want to view.
-
Accounts
-
Households
-
Securities
-
-
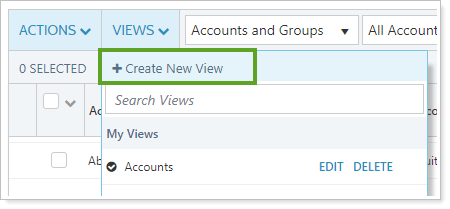
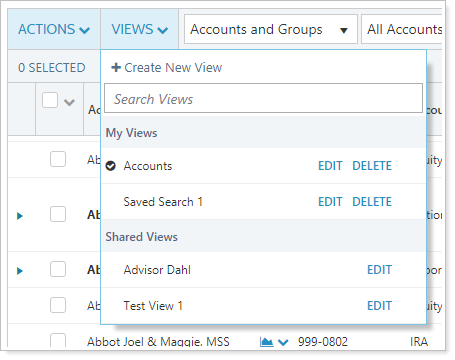
On the Views menu, click Create New View. This opens the Create View dialog box.
-
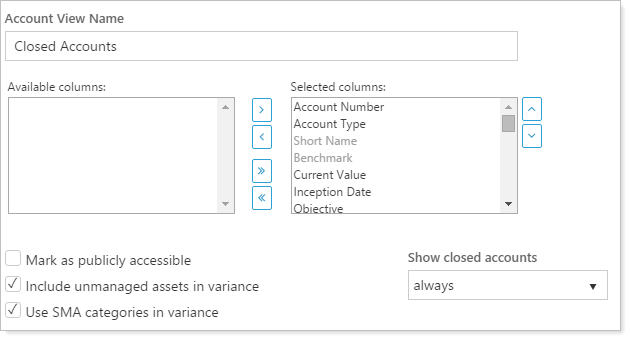
Type the name for your new view in the View Name box. Be descriptive so you can identify your view later.
-
Complete the following settings:
| Setting | Where You'll See This Setting | More Information |
|---|---|---|
| View Name |
|
Type a name for the account view. This name will appear in the Views list once you create the view.
|
| Mark as publicly accessible |
|
This setting allows you to share your views with other users. You will see any views you have created, plus any that have been made publicly available (and which an administrator has given them permission to view, using the User Management page).
If you click Save As New, the Mark as publicly accessible check box will be cleared. You will need to edit the report to set it as publicly accessible. This reset occurs for any report when you Save As New. NoteMark as publicly accessible is only available after the view is saved for the first time. When you first create a new view, you will not see this setting. To share a new view, save the new view, open it again, and select Mark as publicly accessible. |
| Available and selected columns |
|
Choose the columns you want to appear on the page.
You can also rename these columns. For details, visit Customize a View Column Name. |
| Include unmanaged assets in variance |
|
Select this option if you want Advisor View to include unmanaged assets in the calculation for percent variance from target allocation. This calculation will appear in the Percent Variance column. NoteThis option will be grayed out until you add the Percent Variance column to the view. |
| Use SMA categories in variance |
|
Select this option if you want Advisor View use SMA categories in the calculation for percent variance from target allocation. This calculation will appear in the Percent Variance column. NoteThis option will be grayed out until you add the Percent Variance column to the view. |
| Show closed accounts |
|
Choose one of the following:
|
| Filter categories |
|
This setting allows you to select the desired filter categories to narrow down your securities by various categories. When each general category has been added, you will be able to select the exact filter you want to apply to each.
If you want to create a new category, see Security Categories. |
-
Click Save.
Customize a View Column Name
To customize a column name:
-
Open the grid page you want to view.
-
Accounts
-
Households
-
Securities
-
-
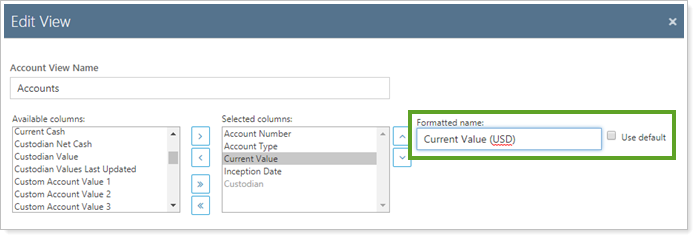
Clear the Use default check box, and type the name you want shown in the view column.
Note
If a column name displays in gray, it can’t be edited.
-
Click Save.
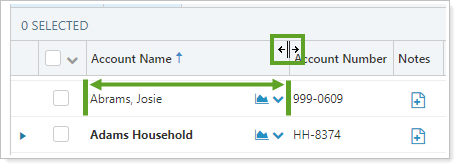
Auto-Fit Column Width
On grid pages, you can automatically fit column width to fit the data or resize the columns manually.
To resize, hover the cursor over the column edge until it changes to  .
.
-
Click and drag to manually resize columns.
-
Double click to automatically resize columns to fit the data width.
Edit a View
To edit an account view:
-
Visit one of the following pages:
-
Accounts
-
Households
-
Securities
-
-
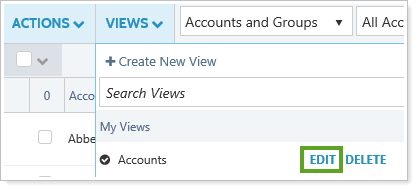
On the Views menu, click Edit next to the view you want to edit.
Note
If a column name displays in gray, it can’t be edited.
-
Make the necessary changes and then click Save.
Setting Where You'll See This Setting More Information View Name -
Accounts Page
-
Households Page
-
Securities Page
Type a name for the account view. This name will appear in the Views list once you create the view.
Mark as publicly accessible -
Accounts Page
-
Households Page
-
Securities Page
This setting allows you to share your views with other users. You will see any views you have created, plus any that have been made publicly available (and which an administrator has given them permission to view, using the User Management page).
-
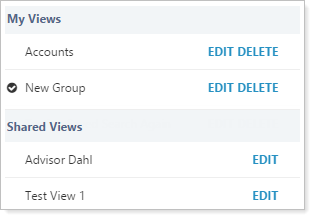
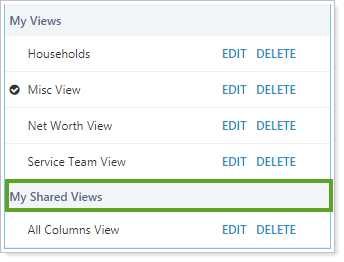
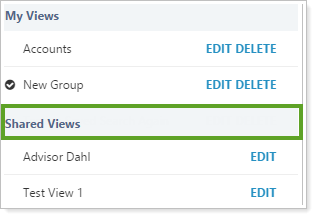
Views you share with others appear under My Shared Views.
-
Views shared with you by other users appear under the Shared Views section.
If you click Save As New, the Mark as publicly accessible check box will be cleared. You will need to edit the report to set it as publicly accessible. This reset occurs for any report when you Save As New.
Note
Mark as publicly accessible is only available after the view is saved for the first time.
When you first create a new view, you will not see this setting. To share a new view, save the new view, open it again, and select Mark as publicly accessible.
Available and selected columns -
Accounts Page
-
Households Page
-
Securities Page
Choose the columns you want to appear on the page.
-
To add a column to the list, in the Available columns box, click the column you want to add and then click >.
-
To remove a column from the list, in the Selected columns box, click the column you want to remove and then click <.
-
To add all available columns to the list, click >>.
-
To remove all columns from the list, click <<.
-
Use the ˄ and ˅ buttons to arrange the columns on the report.
You can also rename these columns. For details, visit Customize a View Column Name.
Include unmanaged assets in variance -
Accounts Page
Select this option if you want Advisor View to include unmanaged assets in the calculation for percent variance from target allocation. This calculation will appear in the Percent Variance column.
Note
This option will be grayed out until you add the Percent Variance column to the view.
Use SMA categories in variance -
Accounts Page
Select this option if you want Advisor View use SMA categories in the calculation for percent variance from target allocation. This calculation will appear in the Percent Variance column.
Note
This option will be grayed out until you add the Percent Variance column to the view.
Show closed accounts -
Accounts Page
Choose one of the following:
-
Only as members of group. Shows a closed account only if it's an underlying account of a reporting group.
-
Always. Always show closed accounts.
Note
If your documents are auto-posted to client portals, select this option if you want your documents to be posted to closed accounts as well as current accounts.
-
Never. Never show closed accounts.
Filter categories -
Securities Page
This setting allows you to select the desired filter categories to narrow down your securities by various categories. When each general category has been added, you will be able to select the exact filter you want to apply to each.
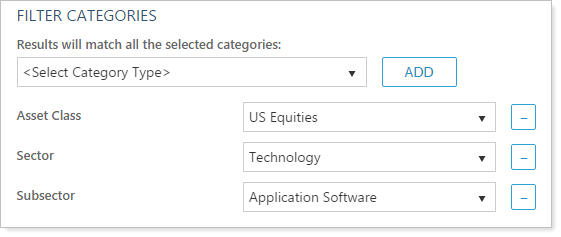
-
Click Add to add categories for filtering. Select the desired category from the list.
-
Click
 to remove filters.
If you want to create a new category, see Security Categories.
-
Switch Views
To switch a view, in the View list, click the desired view in the list. The page view will reflect the settings defined for the view you specified.
Delete a View
To delete a view:
-
Visit one of the following pages:
-
Accounts
-
Households
-
Securities
-
-
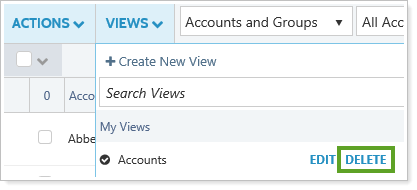
On the View menu, click Delete next to the view you want to delete.
Note
You can only delete views you create or have permission to delete.
-
Confirm the deletion.
Duplicate a View
To duplicate a view:
-
Visit one of the following pages:
-
Accounts
-
Households
-
Securities
-
-
On the Views menu, click Edit next to the view you want to copy. This opens the Edit View dialog box.
-
In the View Name box, type a unique name for the new view you want to create.

-
Make the necessary changes.
Setting Where You'll See This Setting More Information View Name -
Accounts Page
-
Households Page
-
Securities Page
Type a name for the account view. This name will appear in the Views list once you create the view.
Mark as publicly accessible -
Accounts Page
-
Households Page
-
Securities Page
This setting allows you to share your views with other users. You will see any views you have created, plus any that have been made publicly available (and which an administrator has given them permission to view, using the User Management page).
-
Views you share with others appear under My Shared Views.
-
Views shared with you by other users appear under the Shared Views section.
If you click Save As New, the Mark as publicly accessible check box will be cleared. You will need to edit the report to set it as publicly accessible. This reset occurs for any report when you Save As New.
Note
Mark as publicly accessible is only available after the view is saved for the first time.
When you first create a new view, you will not see this setting. To share a new view, save the new view, open it again, and select Mark as publicly accessible.
Available and selected columns -
Accounts Page
-
Households Page
-
Securities Page
Choose the columns you want to appear on the page.
-
To add a column to the list, in the Available columns box, click the column you want to add and then click >.
-
To remove a column from the list, in the Selected columns box, click the column you want to remove and then click <.
-
To add all available columns to the list, click >>.
-
To remove all columns from the list, click <<.
-
Use the ˄ and ˅ buttons to arrange the columns on the report.
You can also rename these columns. For details, visit Customize a View Column Name.
Include unmanaged assets in variance -
Accounts Page
Select this option if you want Advisor View to include unmanaged assets in the calculation for percent variance from target allocation. This calculation will appear in the Percent Variance column.
Note
This option will be grayed out until you add the Percent Variance column to the view.
Use SMA categories in variance -
Accounts Page
Select this option if you want Advisor View use SMA categories in the calculation for percent variance from target allocation. This calculation will appear in the Percent Variance column.
Note
This option will be grayed out until you add the Percent Variance column to the view.
Show closed accounts -
Accounts Page
Choose one of the following:
-
Only as members of group. Shows a closed account only if it's an underlying account of a reporting group.
-
Always. Always show closed accounts.
Note
If your documents are auto-posted to client portals, select this option if you want your documents to be posted to closed accounts as well as current accounts.
-
Never. Never show closed accounts.
Filter categories -
Securities Page
This setting allows you to select the desired filter categories to narrow down your securities by various categories. When each general category has been added, you will be able to select the exact filter you want to apply to each.
-
Click Add to add categories for filtering. Select the desired category from the list.
-
Click
to remove filters.
If you want to create a new category, see Security Categories.
-
-
Click Save as New.
Share a View With Other Users
You can share your views for others to see. Users will see any views they have created, plus any that have been made publicly available (and which an administrator has given them permission to view, using the User Management page). These shared views appear under the Shared Views section of the Views list.
To share a view:
-
Visit one of the following pages:
-
Accounts
-
Households
-
Securities
-
-
On the View menu, click Edit next to the view you want to share.
-
Select Mark as publicly accessible.

Note
By default, marking a view as publicly accessible doesn't automatically share it with all users since a large number of shared views would clutter the Accounts page. Instead, shared views must be approved by an administrator before they are shared with others. If you're signed in as an administrator, a Manage View Access link will appear. Click this link to share it with other users.
For details, see Manage Views.
-
Click Save.