 Back
Back Home > Advisor View > Reports > Dynamic and PDF Reports > Global Report Setup Options > Dates and Date Periods
|
Back |
Home > Advisor View > Reports > Dynamic and PDF Reports > Global Report Setup Options > Dates and Date Periods
|
Dates and Date Periods
|
|
The Dates page enables you to create and edit the date options that are available on reports globally so you do not have to recreate frequently-used dates or date ranges in each report.
Dates differ from date periods because dates represent a specific point in time, such as December 31, 2013 or Last Quarter End, while date ranges represent a span of time, such as Quarter to Date or Previous 12 Months.

Find Dates and Date Periods on the Setup menu under Firm Settings.
Across the date and date period pages, you can click on the column header to sort by column data. The ![]() arrow indicates which column the is being sorted and sorting order.
arrow indicates which column the is being sorted and sorting order.
Often you may want to view data for a specific date, such as the previous month end, quarter end, year end, or other specific date. Use dates to capture a snapshot of one point in time across a variety of dynamic and PDF reports.
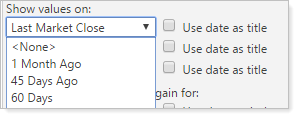
When editing dynamic reports, look for the Show values on: list to find the dates you set up.
To create a date:
On the Setup menu, under Firm Settings, click Dates.
Click Create.
In the Date Name box, type a name for the date.
Choose one of the following options:
Specific date. Use the calendar to select the day.
Past date. In the list choose Days, Months, or Years, and specify the number.
Previous. Choose from the previous day, month, quarter, or year.
When finished, click Create.
To make changes to an existing date:
On the Setup menu, under Firm Settings, click Dates.
Click Edit next to the date you want to modify.

Make the necessary changes, and then click Save.
To delete a date:
On the Setup menu, under Firm Settings, click Dates.
Click Delete next to the date you want to delete. The Delete link does not appear when the date is in use by a report.
When it's time to provide clients with performance metrics, or when you want to execute internal financial analysis, you often want to see data over a range, such as month to date, quarter to date, or year to date.
Use date periods to capture data across a span of time instead of a single day, such as Inception to Date or 2015, and access those date ranges across a variety of dynamic and PDF reports.

We offer a number of date period types so you will have flexibility in setting up your date periods the way that you want them.

When editing dynamic reports, look for the Show returns or investment gain for: list to find the date ranges you set up.
When creating a date period, these are the types of date periods you can create and how they'll behave in various situations.
Use this date period when you want absolute, set dates. The date period will not update or change, but will remain constant.
To create a Specific Period type date period, use the calendars to select the start and end date for the period. To set the start date as the inception of the account or group, click Use inception as start date.
When creating a Previous date period, choose Days, Months, Quarters, or Years, and specify the number. Previous/trailing date periods are automatically updated, so this option is an efficient way to create dynamically updating periods. Each date period automatically updates after a complete term:
365 Days—Previous 365 days to date. Updates after every market close.
12 Months—Previous 12 months from prior month end. Updates after each completed month.
4 Quarters—Previous four quarters from prior quarter end. Updates after each completed quarter.
1 Year.—Previous 1 year from prior year end. Updates after each completed year.
To understand how this date period works, think:
End of previous day/month/etc. (counting from As Of date) - x days/months/etc. = Start Date
For example, if the As of date is 9/15/2016 and we want Previous 2 years:
Determine the date for the end of the previous year (12/31/2015).
Then calculate your start date: End of the previous year (12/31/2015) - 2 years = 12/31/2013
The date range for your date period will be 12/31/2013 - 12/31/2015.
The Always use previous period setting can be used with a Previous date period to adjust how the date period behaves when used at the end of a date period range. By selecting this option, a Previous 1 Year(s) date period run on 12/31/2019 would produce results for 2018. If you clear this option, this same date period, run on 12/31/2019, would produce results for 2019.
To create an Inception to Previous date period, choose your rolling end date, such as quarter end. Your start date will be the inception date of the account or group.
To understand how this date period works, think:
Current day/month/etc. - x days/months/etc. = End Date
For example, if the As of date is 9/15/2016 and we want Inception to Previous 2 years ago:
Find the month/day prior to the start of a year—12/31.
Calculate the year: Current year (2016) - 2 years ago = 2014
The end date for your date period will be 12/31/2014.
The Always use previous period setting can be used with an Inception to Previous date period to adjust how the date period behaves when used at the end of a date period range. By selecting this option, an Inception to Previous 1 Year(s) Ago date period run on 12/31/2019 would produce results that end at 2018. If you clear this option, this same date period, run on 12/31/2019, would produce results that end at 2019.
This date period setting allows you to set up a dynamically updating rolling date period with a start and ending time period you designate. When you create this date period, you specify an amount of time that relates to the current as of date and then provide a non-specific beginning and end. Alternately, you can also create a rolling time period that begins with a specific custom date.
In order to create a date period that dynamically updates, enter a beginning and ending range of time using the Day(s), Month(s), Quarter(s), or Year(s) options. As time goes on, this date range will adjust to the as of date, so you won’t have to update the date period in the future. In addition, your end date can be 0 Day(s), Month(s), Quarter(s), or Year(s) ago which makes your end date the most current it can be.
For example, if the as of date is July 1, 2021 and you run a report with the 2 Month(s) to 7 Day(s) AgoPrevious to Previous date period, the report data will begin two months prior to the as of date (April 30, 2021) and end seven days ago (June 24, 2021).
Here’s how we calculate the start and end dates of this example. Your start date is 2 Month(s) ago and the as of date is July 1, 2021:
July 1 – 2 months = April 30, 2021.
Your end date is 7 days ago from the as of date:
July 1 – 7 days = June 24, 2021.
Date periods that have a set starting date but a rolling end date can be helpful if you want to see data for a defined period on an ongoing basis, such as the beginning of the quarter to now or the beginning of the calendar year to now. To create a date period with a custom start date, choose Custom Date for your start date and enter the calendar date where you want your data to start. This can be helpful if you want to see data for a defined period on an ongoing basis such as the beginning of the quarter to now or the beginning of the calendar year to now.
The Always use previous period setting can be used with a Previous to Previous date period to adjust how the date period behaves when used at the end of a date period range. By selecting this option, a 1 Year(s) to 0 Day(s) Ago date period run on 12/31/2019 would produce results for 2018. If you clear this option, this same date period, run on 12/31/2019, would produce results for 2019.
This date period setting allows you to set up a trailing date period that covers a specific term. Previous or trailing date periods are automatically updated, so this option is an efficient way to create dynamically updating periods.
To create this date period, choose the duration of the period:
Month to Date. Use this option to define a period of time that covers the current month to the As Of date.
Quarter to Date. This option lets you define a period of time that covers the current quarter to the As Of date.
Quarter to Month End. This option begins as the beginning of the quarter and ends at the end of the previous month. You can potentially use this option to match dynamic reports to client statements.
Year to Date. This option lets you define a period of time that covers the beginning of the current year to the As Of date.
Year to Month End. This option begins as the beginning of the year and ends at the end of the previous month. You can potentially use this option to match dynamic reports to client statements.
Year to Quarter End. his option begins as the beginning of the year and ends at the end of the previous quarter. You can potentially use this option to match dynamic reports to client statements.
Inception to Date. Use this date period when you want to start the date period at a certain significant date and you want to see everything from then until now.
Custom to Date. With Custom to Date, you can designate any set start date. The period runs from that set date through the enterprise As Of date.
PDF reports use the as-of date to determine when to end the "to Date" period. For example, if you run a quarterly report with an as-of date for 3/31/2015, the Year to Date period will run from 12/31/2014 to 3/31/2015.
When running the billing history for the Inception to Date date period, an account's performance inception date may not correspond with the desired billing start date. To avoid unexpected billing history reporting outcomes, make sure that the billing history is generated within the report date period.
If a billing history is run before the start of the report date period, that billing history will not be included in the report. For example, if a firm generates a billing history before an account's performance inception date and then runs a report from Inception to Date, that billing history will not show up on the report's billing section.
To create a date period:
On the Setup menu, under Firm Settings, click Date Periods.
Click Create.
In the Date Period Name box, type a name for the date period. This name will appear in the date period lists when you customize your reports.
Choose one of the following options. Click the link to find out more information:
When finished, click Save.
To make changes to an existing date period:
On the Setup menu, under Firm Settings, click Date Periods.
Click Edit next to the date period you want to modify.

Make the necessary changes, and then click Save.
To delete a date period:
On the Setup menu, under Firm Settings, click Date Periods.
Click Delete next to the date period you want to delete. The Delete link does not appear when the date period is in use by a report.
Date Period Name allows you to assign a name to a date period. Because this name can be surfaced in reports, Date Period Name also lets you give the date period a descriptive name that describes the period of time you want to show.
Merge fields can be added to Date Period Name. These fields show as actual dates in reports and allow you to more specifically describe a date period, especially for date periods that have rolling time periods.
To use a merge field:
On the Setup menu, under Firm Settings, click Date Periods.
Click Create.
In the Date Period Name box, type a name for the date period. This name will appear in the date period lists when you customize your reports.
Use one of these merge fields in Date Period Name:
| Merge Field | Output | More Information |
|---|---|---|
| {From date} | A date in MM/DD/YYYY format | Shows the calculated or explicitly stated beginning date for this date period. If the beginning of the date period is inception, this merge field will show Inception. |
| {To date} | A date in MM/DD/YYYY format | Shows the calculated or explicitly stated end date for this date period. |
| {YYY of To date} | A year in YYYY format | Shows the year of the end date. |
Choose one of the following options. Click the link to find out more information:
When finished, click Save.
In Advisor View, you can quickly view reports for any date or date range for which data exists. The Dates and Date Periods pages allow you to create multiple dates and date ranges that you can reuse later on other reports. Over the years, some of you have mentioned that dates and date ranges that are no longer needed have built up over time from everyday use. These obsolete dates and date periods make it difficult to find the date or date period you want to add to a report and clutter your drop-down lists.
In some cases, you may want to add a date or date range to a specific report - for example, let's say you just want to view performance for a three-day period to troubleshoot a client-specific issue. You probably wouldn't want to use this date period again.
With this scenario in mind, use temporary dates and date periods for a specific report. Temporary dates and date periods will be used on the report for which it was created, but will not appear in any other drop-down lists.
To create a temporary date:
Open the dynamic report where you want to create a temporary date, then click Edit.
In the Date list, click Create New.
In the Date name box, type a name for the date and then specify the date you want to use.

To delete a date:
On the Setup menu, under Firm Settings, click Dates.
Click Delete next to the date you want to delete. The Delete link does not appear when the date is in use by a report.
This page allows you create and edit date periods that are available on reports. Dates periods are different from dates because they represent a span of time instead of a single day.
To create a temporary date period:
Open the dynamic report where you want to create a temporary date, then click Edit.
In the Date range list, click Create New.
In the Date Period name box, type a name for the date period and then specify the date range you want to use.
To specify the date period is a temporary date period, clear the Save this date period for all reports and all users check box.

Click Create.
To delete a date period:
On the Setup menu, under Firm Settings, click Date Periods.
Click Delete next to the date period you want to delete. The Delete link does not appear when the date period is in use by a report.

