Contents
|
|
More powerful saved searches
Most of you use saved searches every day to locate accounts that meet specific criteria - for example, you may use saved searches to find accounts that are holding MSFT. Over the years, many of you have sent in suggestions on how to make saved searches even more powerful. We're pleased to announce that we've added the following search enhancements that many of you will be excited about:
-
NOT Clause. In the past, you could only search for accounts that met a specific criterion, but you couldn't search for accounts that did not meet a specific criterion. With this release, you can add a NOT clause to your saved searches so that you can locate accounts that do not meet a specific criterion - for example, accounts that are not holding MSFT.
-
Add the same search option multiple times. With this release, you can add a search option more than once - for example, you can quickly find accounts holding both MSFT and IBM.
-
Filter sets. Now you can add filter sets to your saved searches. Filter sets are essentially a search within a search - for example, you can use a filter set to find accounts assigned to a particular Allocation or Security Level model and have an account value of at least $250K and is holding either MSFT or IBM.
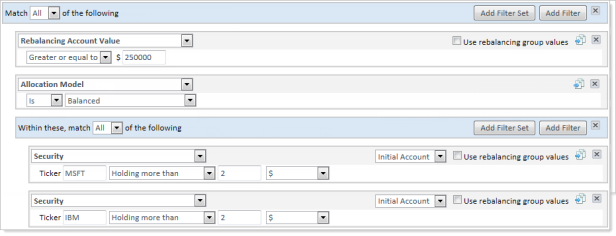
To check out the new saved searches, follow these steps:
-
On the Accounts menu, click Search Options.
-
Click Add Filter.
-
Use the list to add a search option to your saved search. Once selected, additional criteria will appear. Make the appropriate adjustments where applicable for each search option you add. For a detailed description of each search option, visit Working With Saved Searches.
Note
For some search options, you may have the option to use the rebalancing group values. This option allows you to determine if you want to use underlying account values or the total net value at the rebalancing group level.

For example, let’s say you have a rebalancing group with three underlying accounts, each worth $100K. If I did not select this check box, Advisor Rebalancing would not find any of the underlying accounts or the rebalancing group. However, if you selected this check box, Advisor Rebalancing would look at the group’s value of $300K and return all of the underlying accounts and the group.

-
To add a filter set, click Add Filter Set. Repeat these steps to add additional search criteria.
TIP
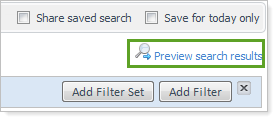
To preview your saved search, click Preview search results.
-
Type a name for the search in the Search Name box, and then click Save.
Customize the dashboard
The first time you sign in to Advisor Rebalancing after the update, you'll see that the dashboard has a new look. With this release, you can add your saved searches to the dashboard. This new feature will make it easy to quickly find information that is relevant to your firm.
In addition, you can also determine the page where Advisor Rebalancing should take you when you click the saved search on your dashboard.
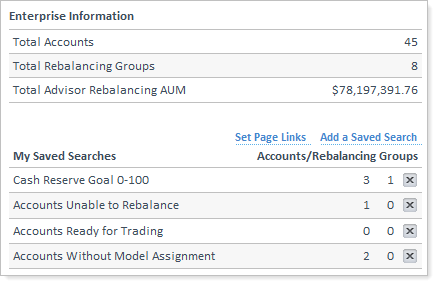
To customize the new dashboard, follow these steps:
-
Click the Home menu.
-
Click Add a Saved Search.

-
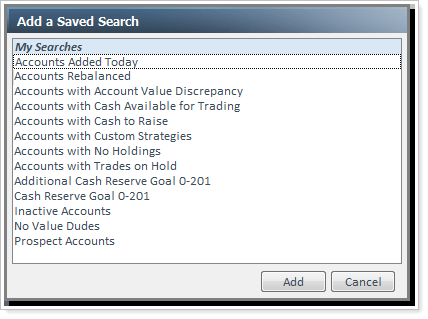
On the Add a Saved Search dialog, click the saved search you want to add to the dashboard, and then click Add. To add more than one saved search, press and hold CTRL while you click the saved searches. If you don't see your saved search in the list, visit Create, Edit, and Delete Saved Searches for more information on creating saved searches.
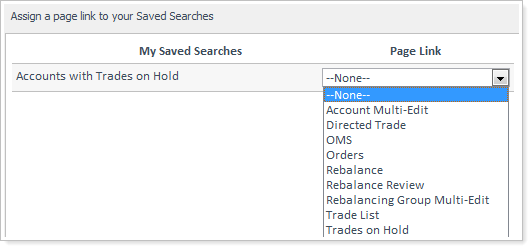
- Once you've added your saved searches, click Set Page Links. On this page, you can set the page where Advisor Rebalancing should take you when you click the saved search on your dashboard.
EXAMPLE
Let's say you set up a saved search for accounts with trades on hold. When you click the saved search, Advisor Rebalancing can take you to the Rebalance Review page.

- Use the Page Link list to specify where Advisor Rebalancing should take you when you click the Saved Search, and then click OK.
-
To change the order that your saved searches appear on the dashboard, move your cursor over the saved search until your mouse pointer changes to a
 . Press and hold the left mouse button and drag the saved search to the appropriate location. Release the left mouse button
 -
To remove a saved search from the dashboard, click
 .
.
New look and feel for key account pages
Over the years, adding countless features to Advisor Rebalancing has made it an increasingly powerful rebalancing application, but along the way the interface has become slightly complex.
That's one of the reasons that we're embarking on a series of updates that will make Advisor Rebalancing as easy to use as possible. These updates will be a large effort, and we'll be working on these enhancements over the next year or so.
We've started things off by refreshing the following pages:
-
Rebalance
-
Directed Trade
-
Rebalance Review
-
Trade List
-
Accounts
-
Rebalancing Groups
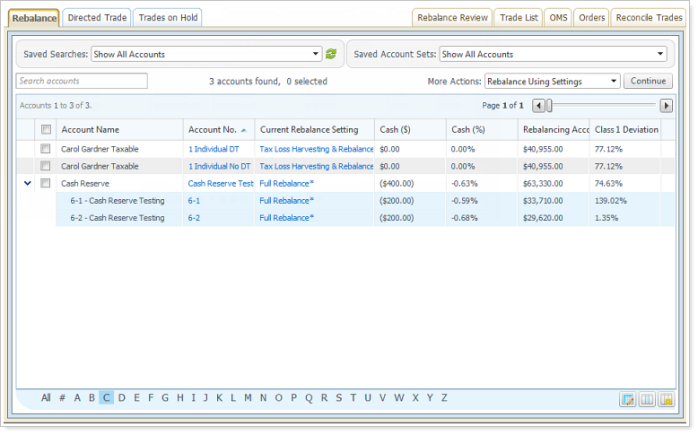
While updating these pages, we've also added the following new features that many of you will be excited about.
Alphabet bar
When working with a large number of accounts, it wasn't always easy to browse to a particular account - for example, you didn't know if the accounts on page 6 would start with C or D. With this in mind, we've introduced the alphabet bar.
On the key accounts pages, you'll now see the alphabet bar running along the bottom of your screen. When you click a letter on the bar, Advisor Rebalancing will show you the accounts that begin with that letter.

Customize Columns
Many of you asked for a way to fine tune your accounts pages by changing the width of the columns – after this release, you can.
Resize a column
To resize a column, follow these steps:
-
Visit one of the following pages:
-
Rebalance
-
Directed Trade
-
Rebalance Review
-
Trade List
-
Accounts
-
Rebalancing Groups
-
-
Move the cursor to the right boundary of the column you want to resize until your mouse pointer changes to a
 .
.
-
Hold down the left mouse button and drag the boundary of the column to a new width.
-
Release the left mouse button.
TIP
To reset all columns to the default width, click Resize column width button that appears to the right of the alphabet bar.

Change the Column Order
As a part of the page updates, we've updated how you customize the columns and change the order.
To change the column order, follow these steps:
-
Visit one of the following pages:
-
Rebalance
-
Directed Trade
-
Rebalance Review
-
Trade List
-
Accounts
-
Rebalancing Groups
-
-
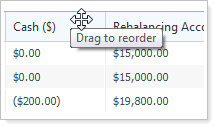
Move the cursor to the top-right boundary of the column you want to move until your mouse pointer changes to a
 .
.
-
Press and hold the left mouse button, drag the column to the desired location, and then release the mouse button.
Searching for accounts
We've made it easier for you to search for accounts. In previous releases, you had to click the Account Quick Find link to search for a particular account. With this release, we've moved the Account Quick Find from a separate link to the main page, such as the Accounts page.
To search for an account, type the criteria you want to search for in the Search accounts box, and then press ENTER. Advisor Rebalancing will return results where the account name meets the criteria you entered.

Account Sets
Account sets are a collection of accounts that you can create on the fly. Unlike saved searches, the accounts assigned to an Account Set don't have to be related - for example, you can create an account set for accounts that you can't easily group using a saved search. You can then use the Saved Account Sets list to display the accounts assigned to the account set.

To create an account set, follow these steps:
-
Visit one of the following pages:
-
Rebalance
-
Directed Trade
-
Rebalance Review
-
Trade List
-
Accounts
-
Rebalancing Groups
-
-
Click the Toggle account set builder button that appears to the right of the alphabet bar.

-
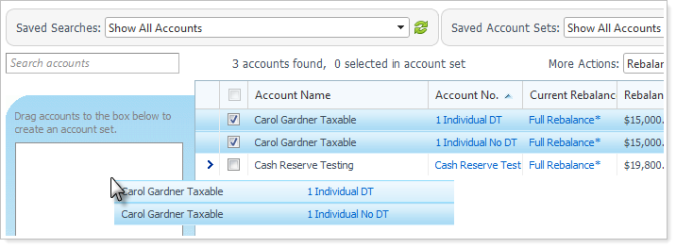
Select the check boxes next to the accounts you want to add to the account set, and drag the accounts into the Drag accounts to the box below to create an account set box.
-
When finished adding accounts, click Save Account Set.
-
In the Select Account Set box, click Create New.
-
In the Account Set Name box, type a name for the account set and then click Save.
-
Use the Saved Account Sets list to display the accounts assigned to the account set.
Improved More Actions list
We've made the More Actions list more powerful. The More Actions list now includes all actions that are specific to the page, including the primary action expected for that page - for example, the default option on the Rebalance Review page is Approve Trades. The primary action will be selected by default and each page will have a Continue button to initiate functionality.

Quickly view historical account Notes
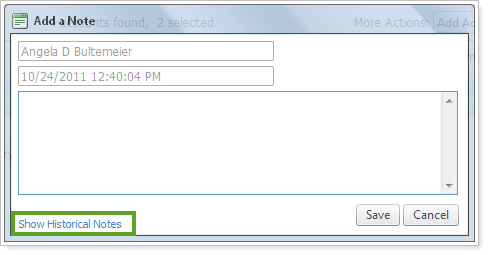
We've made it simpler to view and add notes. You can now add notes by selecting Add Account Note in the More Actions list and then clicking Continue. If you want to view historical notes for the accounts, click Show Historical Notes.
Page-Specific updates
When updating the look and feel of these pages, we made some changes that only affect a single page.
Rebalance Page
In the previous page layout, you could change the rebalance setting for an account using a drop-down list. In the new release, we've added a dialog for changing the rebalancing setting.
To check out this feature, follow these steps:
-
Click the Rebalances & Trades menu.
-
Click the current rebalance setting.

-
In the Set Rebalance Setting list, click the appropriate rebalance setting, and then click Save.
Rebalance Review
We've made the following changes to the Rebalance Review page:
-
New Rebalance Status. When an account has rebalanced successfully (with or without warnings) and some of the trades are put on hold, the Rebalance Status will be appended with (Trades on Hold) - for example, Success (Trades on Hold). When an account has rebalanced successfully (with or without warnings) and all of the trades are put on hold, the Rebalance Status will be All Trades on Hold.
-
Rebalance Summary Available for Underlying Accounts. On the new Rebalance Review page, you can view the rebalance summary for underlying accounts within a rebalancing group. Simply click the
 to show the accounts assigned to the rebalancing group.

Freeze Columns
When working in Advisor Rebalancing, it can be difficult to identify an account when reading data in a distant column and the name and numbers that identify the account disappear.
In some cases, you may find yourself scrolling back and forth trying to read first the column and then the data.
To avoid this back and forth, use the freeze columns feature. Freeze columns allows you to lock specific columns so that they will always be visible on screen no matter how far you scroll.
For example, you may want to freeze three columns so that you can always see the Account Name, Account Number, and Rebalance Status when you scroll through the Rebalance Review page.
To choose the number of columns that will be frozen, follow these steps:
-
On the Setup menu, click User Preferences.
-
In the Number of columns to freeze box, specify the number of columns.
-
Click Save.
Additional Updates
We’ve made some additional changes to make Advisor Rebalancing easier to use. While these changes aren’t as powerful as some of the new features we’ve added, they’re certainly worth mentioning.
-
We've added the Account Name to the Cash Reserves bulk report.
-
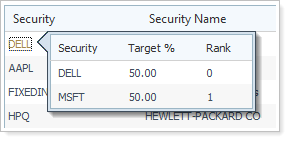
When you're creating a Security Level model, the securities with substitutes will now show as hyperlinks. When you place your mouse over the hyperlink, you can see the substitute securities. In the example below, DELL has a substitute security.
