Contents
Introduction
After Advisor OMS has been enabled in your system, there is initial setup that must be done within Advisor Rebalancing to make sure Advisor OMS will be trading optimally for you. Below, you'll find information about initial setup, as well as other available settings you may need to adjust to produce the trades you want.
Set Up Advisor OMS in System Settings
Once Advisor OMS is enabled in Advisor Rebalancing, the first step in the process of enabling Advisor OMS for your firm is to select the brokers that are available for trading, as well as the default broker your firm will use. Accounts that you enable for use with Advisor OMS can have any broker assigned to them, or simply use the default broker, as defined.
Set Up Brokers in Advisor OMS
To select Advisor OMS settings, follow these steps:
-
On the Setup menu, click System Settings.
-
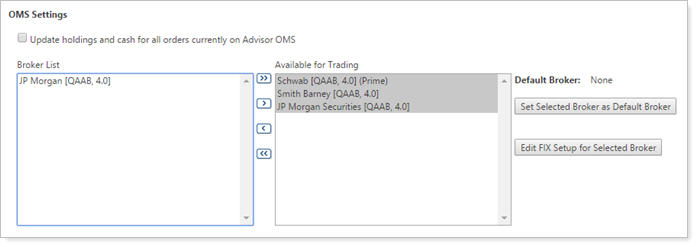
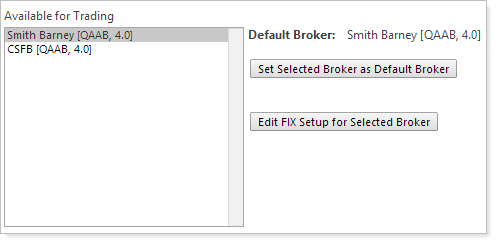
Under OMS Settings, select the brokers that you use. The brokers in the Available for Trading list will be available to select as defaults on individual accounts and for trades.
To add a broker, click the broker in the Broker List and then click
.
To add all brokers, click
.
To remove a broker, click the broker in the Available for Trading list and then click
.
To remove all brokers, click
.
-
In the Available for Trading list, select the broker that you want as the default and then click Set Selected Broker as Default Broker.
Note
The Edit FIX Setup for Selected Broker button is also available here. However, when implementing Advisor OMS, your Implementation Consultant will advise you on whether or not a broker’s FIX Client ID needs to be edited. Please do not edit the FIX Client ID without verifying the change with your Tamarac service team.
-
Click Save.
Update Holdings and Cash Automatically
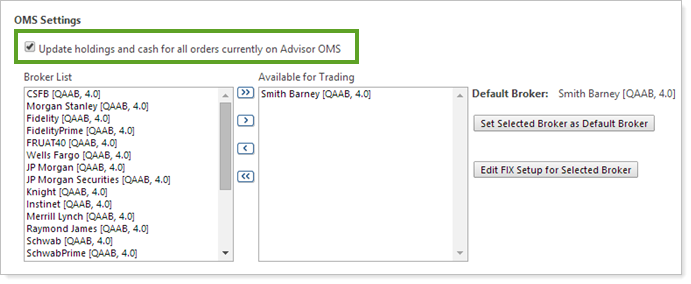
Advisor Rebalancing can automatically update your holdings using trades on the Advisor OMS page. The holdings are updated if an account has trades on the Advisor OMS page and you save the account or rebalance it.
To automatically update accounts' holdings using trades in Advisor OMS, follow these steps:
-
On the Setup menu, click System Settings.
-
Under OMS Settings, select the Update holdings and cash for all orders currently on Advisor OMS check box.
-
Click Save.
Enable Accounts to Use Advisor OMS
Once Advisor OMS trading is enabled in your enterprise and you have selected the brokers you will use and the default broker, the next step is to enable accounts to use Advisor OMS trading. This can be done individually or in bulk.
Notes
-
Accounts enabled for Advisor OMS trading can only trade EFTs and equities using Advisor OMS.
-
Advisor OMS Trading must be enabled on any account before trades can be executed using Advisor OMS. If Advisor OMS Trading is not enabled, any trades for the account will be submitted via a trade file in the standard Advisor Rebalancing trading workflow.
Enable Advisor OMS In a Single Account
To enable Advisor OMS in a single account, follow these steps:
-
On the Accounts menu, click Account Settings .
-
In the Search accounts box, type the account number or name for the account in which you want to enable Advisor OMS trading and then click Select.
-
Go to the Account Configuration tab.
-
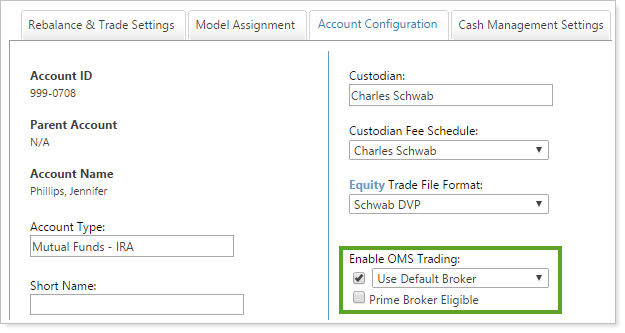
Select the Enable OMS Trading check box and then, in the default broker list, select the default broker for that account.
-
Click Save.
Enable Advisor OMS in Multiple Accounts
To enable Advisor OMS for multiple accounts, follow these steps:
-
On the Accounts menu, click Accounts.
-
Select the accounts where you want to enable Advisor OMS trading.
-
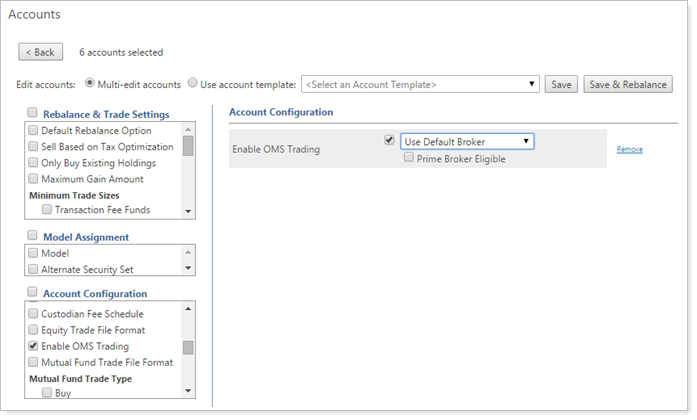
In the More Actions list, click Multi-Edit Accounts, and then click Continue.
-
In the left pane, under Account Configuration, select the Enable OMS Trading check box.
-
In the right pane, select the Enable OMS Trading check box and then in the Use Default Broker list, select the default broker for the accounts.
-
Click Save.
Prime Broker Setup in Advisor OMS
Advisor OMS supports prime brokers when trading. If you have trades eligible for prime brokers, you can split orders that are prime broker eligible and quickly change non-prime broker trades to prime broker trades.
Below are important steps you'll need to take to set up prime brokers in Advisor OMS.
Specify Prime Eligible Brokers
To set a broker as a prime eligible broker, follow these steps:
-
On the Setup menu, click System Settings.
-
Under OMS Settings, click the broker you want to set a prime eligible and then click
 to add the broker to the Available for Trading list.
 -
Click the broker you want to specify as prime broker eligible and then click Edit FIX Setup for Selected Broker.
-
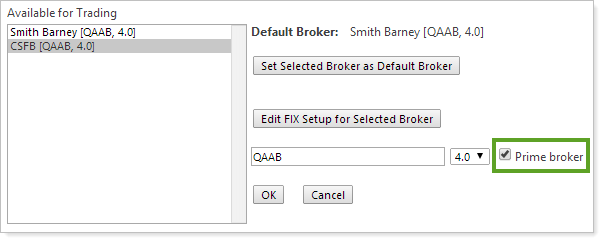
Select the Prime Broker check box.
-
Click OK.
Note
Once you set the broker as a prime broker on the System Settings page, you'll need to enable the broker as prime for each account. See Enable a Prime Broker for an Account.
Enable a Prime Broker for an Account
To enable a prime broker for an account, follow these steps:
-
If you haven't already, specify the prime broker on the System Settings page. See Specify Prime Eligible Brokers.
-
On the Accounts menu, click Account Settings.
-
In the Search accounts box, type the account number or name for the account in which you want to enable prime broker trading and then click Select.

-
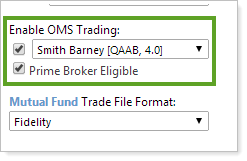
On the Account Configuration tab under Enable OMS Trading, click the prime broker you want to enable for the account.
-
Select the check box next to the broker and then select the Prime Broker Eligible check box.
-
Click Save.
Add the Prime Qty Column
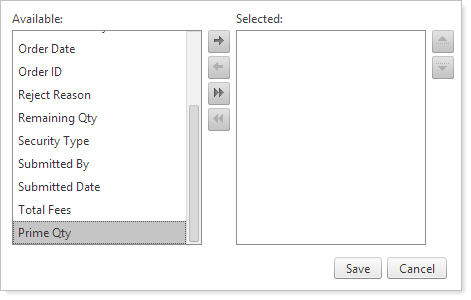
When working with prime brokers, the Prime Qty column is useful because it shows the number of eligible prime broker trades in Advisor OMS.
To add the Prime Qty column, follow these steps:
-
On the Advisor OMS page, click the
 button in the lower-right corner of your screen.
 -
From the Available list, click Prime Qty and then click
 . and then click Save.
-
Click Save.
View Prime Eligible Accounts By Security
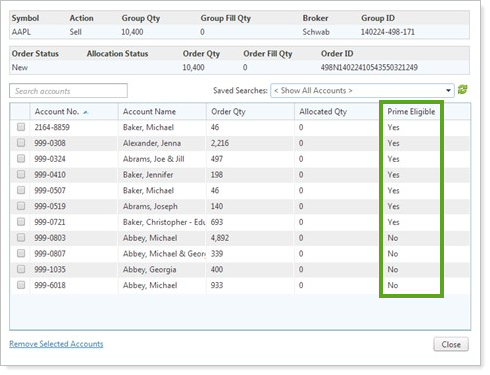
The Advisor OMS page allows you to view the accounts holding any traded securities on the Advisor OMS page and see if the accounts are prime eligible.
To find prime eligible accounts by security, follow these steps:
-
Choose Advisor OMS on the Rebalance & Trade menu.
-
Find the security you'd like to view and click the ticker for that security in the Symbol column. The status for each account appears in the Prime Eligible column.
